Tuesday, May 31, 2011

Little Lady Size Aprons


Linking to:

     My little lady had a couple little friends having birthdays recently. Since she is really into "cooking" these days, I thought aprons would be a fun gift for the little friends. Aprons are super easy to make without a pattern. These measurements will make an apron that will fit about a 2 to 5yr old.

     Essentially, you are making a 7 inch x 7 inch square with a 7 inch line on either side.  Find the center of the square at the waist. Measure 10 1/2 inches in an arc from one side of the waist to the other. This will give you a perfect half circle for the skirt part of the apron.

      The straps are 15 inches long each. The ruffle around the bottom of the orange one is about 40 inches long.
      I like to double layer them so there is no exposed seams. Sew the pocket on the front, and pin a ruffle and straps raw edges lined up.


     Pin the other layer on top, making sure all the straps are out of the seam area. Sew around the edge leaving a space to turn right side out.


     I then top stitch around the whole thing to make it look neat and tidy.


     The second one I did, I used ribbon instead of fabric to make the straps and embellish the skirt. It was a LOT faster that way and I think is just as cute.


     An adult size can easily be made using the same exact method only larger measurements.

Linking to:
Homemaker on a Dime
Simple Home Life
Freckled laundry
Just A Girl
Sun Scholars

Friday, May 27, 2011

The Yummiest Banana Bread Ever!


     This is probably the one and only time you'll ever see a recipe on here. I am not a gal who loves cooking nor am I especially good at it. (As is illustrated by the fact that I caught my oven on fire last night with my newest attempt at culinary art...my house still stinks like smoke!) My sisters are great cooks, but somehow that gene missed me. I usually stick to recipes that are short and non-complicated. This is actually my sister's recipe and her's always tastes better than mine. That being said even my poor attempts taste scrumptious, so that is how you can tell this is a good recipe!
     Want to make some? Here you go.
You'll need:
5T butter
1/2 C sugar
1/2 C light brown sugar
1 lg egg
2 egg whites
1 t vanilla flavoring
1 1/2 C mashed ripe bananas
1 3/4 C all purpose flour
1/2 t salt
1 t baking soda
1/4 t baking powder
1/2 C heavy cream
1/3 C chopped walnuts

1. Heat oven to 350 and spray 9x5x3 loaf pan with nonstick cooking spray
2. Beat butter until fluffy - add brown and granulated sugar - beat well - add egg, egg whites, vanilla until well blended - add mashed bananas - beat on high 30 sec
3. Combine four, baking soda, salt, baking powder, in medium bowl - add flour mixture alternately with cream ending with flour mixture - add walnuts
4. Pour batter into loaf pan - bake until browned and toothpick comes out clean - about 1hr and 15min
5. Cool bread in pan on wire rack 10min - remove bread from pan - cool on rack

      I double this recipe when I make it and it turns out great. I've even added blueberries to it and it was super good like that too! Happy baking!

Wednesday, May 25, 2011

Wet Bags

     
      These little bags are so handy to have. They are great for holding wet diapers, wet clothes, muddy shoes, you name it. They are water proof and for the most part hold all smells in as well.  You can throw it in the wash along with everything else and reuse. Typically wet bags are made with PUL (Polyurethane Laminate) fabric on the inside and cotton on the outside. PUL can be purchased at JoAnn's, and some Hancock's carry it as well. You can order it online as well.
     Start by cutting your outer fabric and the PUL to whatever size bag you want. You'll need a zipper the same length. I like to serge around the cotton to keep the edges nice and sturdy after it is sewn. You could also sew a zigzag stitch around the edges to achieve the same affect.

     Line the PUL shiny side up with far edge of your zipper.


 Lay the cotton wrong side out on top, making a "zipper sandwich".


I don't use pins to hold it in place, because the less holes you poke in the PUL the better. Sew the layers to the zipper.


     Do the same thing to the other side.


     I like to top stitch the fabric along the zipper to make it look neater and to keep it from getting caught in the teeth.


      Unzip the zipper halfway. This will keep the zipper pull out of the way while you sew it up.

    
Put the cotton fabric right sides together and the PUL right sides together.


 Sew the PUL together and then the cotton, leaving the bottom open. Flip the cotton over the PUL and close up the bottom.


     The shiny side of the PUL will be facing out so that it can easily be wiped down and cleaned.


     I made a small one to keep in the diaper bag than can hold about five diapers, and a larger one that can hold a day's worth of diapers.


     Again, these are great for more than just diapers. I use them all the time in the summer for wet bathing suits after swimming. I think they are super handy to have, especially if you have kids.

Linking to:
Tea Rose Home
Someday Crafts
Sew Woodsy
Sew Much Ado
Freckled Laundry
Sun Scholars
Simple Home Life

Tuesday, May 24, 2011

Messenger Bag Tutorial - Part 2

    
     I failed to mention yesterday that this bag can be made without all those crazy pockets, you can have as many or as few of them as you like. Hopefully, I can explain to you today how to put it all together without thoroughly confusing you!
     The first thing I did was fuse the two layers of the front panel together and the back panel together. This made the bag stand up nice and sturdy.
      The next thing is to start sewing the front panel. Start with the two small pockets that have elastic on the top. Take the two layers and sew them together right sides together. Leave an opening to flip them right sides out when you are done. Sew the opening close and top stitch around the whole thing. Lay it out and find the center. Put a pin to mark it. Measure two inches to each side of the pin and put two more pins.


      Bring the two outside pins to the center. This makes a box pleat. Measure two inches from the ends and do the same thing. It should look like this.


      Center it on one layer of the larger pocket and sew along the bottom.


      Now sew a piece of 10 inch long elastic to to the top. I used the wrong size elastic in this picture so just overlook that part. Half inch elastic works much better than this thin stuff.


     Flip your pocket up and pin the sides and the down the center.


     Sew the pocket on.


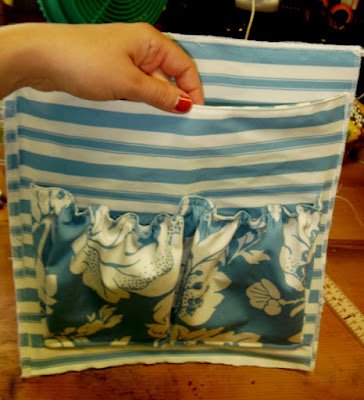
      Sew the two layers of the larger pocket together, turn and top stitch along the top. Sew the larger pocket to the front inside panel. Just lay it on the way it should look and sew along the edges. We'll take care of those raw edges later. So now you have this for the inside front panel.


     Sew another large pocket to the outside. Again, once you have the pocket made just lay it on and sew. Don't worry about the raw edges. This is the front of the front panel.


     To do the back panel start with the outside smaller pockets. Sew them the same way as above. After they are attached, sew on the inside pockets the same way you did the other inside pockets.
     Now sew the 8 inch strips of elastic to the inside layer of both side panels. Sew them 5 inches from the bottom. Sew them into whatever size loops you want. Also if you are making the snap loop for keys attach that now to one of the inside panels. Go ahead and sew the side pockets to the outside.


     Sew or fuse the two layers of each side panel together. Sew the bottom two layers together. Now sew one side to the bottom, and then to the other side. It will look like one long strip.


     Grab something round and round off the corners of your flap piece. Sew it together right sides together, turn and top stitch. Sew it to the back panel making sure you have it facing forward. If you are going to embellish it do it now, it is much harder to do it later like I did. Also I did not put any sort of clasp or snap on mine so if you want that you'll need to do it now too.


     Sew the front to the bottom and the back to the bottom. The bag will look like a large cross. Sew up the sides on the wrong side on all four sides.


      Now we want to get rid of all those raw edges so sew bias tape along each edge. This is a little tricky so just go slow and make sure it catches all the layers.


      Flip it right side out and make your straps for the D-rings.


      Loop the strap through the ring and sew it to the center of each side. Sew it in a box with an "X" through it.


     To make your strap, fold the raw edges to the center and then fold in half. Top stitch down both edges.


     Sew it to the D-rings the same way you did the loops.


      All done! It is a lot of work to make a bag, but to me the benefits of being able to customize it to hold exactly what you want it to makes it completely worth it. Enjoy!

Monday, May 23, 2011

Messenger Bag Tutorial - Part 1


     Say hi to my new diaper bag.


     I fully intend to swipe her for my own personal use when my little ladies are past needing me to pack everything and the kitchen sink along with them. This is what the back looks like. Those are two pockets with elastic run along the tops.


     I stashed a pocket anywhere my little hands could get one. There are nine pockets in this bag. Have I mentioned I love pockets? There is nothing more annoying than trying to hold a squirming baby in one hand while frantically digging under piles of stuff in a black hole of  a bag trying to fish out the pacifier or some other such desperately needed item with the other. All the pockets should keep everything nice and tidy so I can find it. This would also be a great bag for accessories while traveling, or a school bag.
     When you open the flap, directly on the front is a large pocket. It is easily large enough to hold a notebook, or changing mat.


     On the front inside and the back inside is another large pocket the same size and then two smaller pockets with elastic along the tops to hold things nice and snug.


    The pockets are large enough to hold wipes, burp cloth, a change of clothes, pull ups or diapers, my cell phone, wallet, story book and toys, or anything else I might need.


    There is a loop snapped to the inside to hold keys within easy reach.


     There is also elastic sewn to the inside side panels.


     These are sewn so that one loop can hold a bottle or sippy cup, and the other loop can hold something smaller, like diaper cream.

    
     The outside sides also have pockets, wide enough to hold a water bottle, more cups or bottles, or whatever.


     I can comfortable fit cloth diapers and supplies for the baby, pull ups and supplies for the toddler, and my own needed things in it without it being a jumbled, crammed mess.
    If you would like to make one the directions are as follows.  I am going to break this up into at least two posts because it is a rather long project. If you don't want to make one, have one last look before you exit. =)


     I used left over home decor fabric from recovering my car seat. You could also use cotton or canvas. The whole bag and every pocket is fully lined so you will need at least a yard and a half of each your outer and inner fabric. If you are using cotton, I would use an interfacing or a stabilizer of some kind for every section to keep it from being floppy. Since my fabric was so thick to start with, I only used interfuse between the layer of the front panel and the back panel. I also wanted the bag to collapse in on the sides when it wasn't full completely.
     These are the pieces you need to cut. Cut one of both your lining and outer fabric unless otherwise stated. If you are putting interfuse between the pieces you'll need to cut out a piece for each as well.
Front Panel - 13 inches wide x 14 inches tall
Back Panel - 13 inches wide x 14 inches tall
Two Sides - 6 inches wide x 14 inches tall
Bottom - 6 inches wide x 13 inches tall
Flap - 12 inches wide x 16 inches tall
Front inside large pocket - 13 inches wide x 12 inches tall
Back inside large pocket - 13 inches wide x 12 inches tall
Front inside small pockets - 21 inches wide x 8 inches tall
Back inside small pockets - 21 inches wide x 8 inches tall
Front outside large pocket - 13 inches wide x 12 inches tall
Back outside small pockets - 21 inches wide x 8 inches tall
Two Side outside pockets - 6 inches wide x 8 inches tall
Two pieces of 1/2 inch elastic - 8 inches long
Three pieces of 1/2 inch elastic - 10 inches long
Snapped loop for keys - 2 inches wide x 6 inches long
Strap - 33 inches long x 4 inches *only cut ONE
Two D-ring loops - 1 1/2 inches wide x 3 inches long
You will also need a snap, two 1 1/2 inch D-rings, and bias tape
     Phew! All that cutting is the worst part, I promise! The rest goes pretty fast. Check back tomorrow for the rest of the directions. Have a happy Monday!
****Updated: See part 2 here.*****

Linking to:
Between Naps on the Porch
The Girl Creative
The Stories of A to Z
Not Just a Housewife
Fabric Bows and More
My Girlish Whims
Tea Rose Home
Someday Crafts
Sew Woodsy
Sew Much Ado
Freckled Laundry
Sun Scholars
Simple Home Life