

I was going through my posts in order to update my tutorials page, and I discovered something pretty funny. I've never ever made a tutorial for the one piece of clothing I make the most! I call them my "pj skirts" and I wear them. ALL. THE. TIME. because they are just that comfy. I probably have at least 15 of these skirts. Ya I know, rediculous. This skirt is not fancy, it is just your basic, knit maxi skirt with a fold over yoga waist. If just know how to turn your machine on, and sew a straight line, you CAN MAKE THIS!
There are probably a million tutorials out there for this type of maxi already, but here's my take on in it. First off, shop for some knit. You'll need a yard and a half. My opinions on knit are: jersey is great for summer, ponte roma knit is perfect for winter, don't use rib knit, any knit with 3-5% Spandex in it is fabulous! At any rate, pick a knit that holds its shape well...saggy skirts are not cute.
Now, we cut out our skirt. Lay it out folded, just as it is when it comes off the bolt. You'll need to know how long you want it (NOT including the waist band...waist band will add 8-4 inches to length) and how wide your hips are. Cut out your skirt using the following guide.
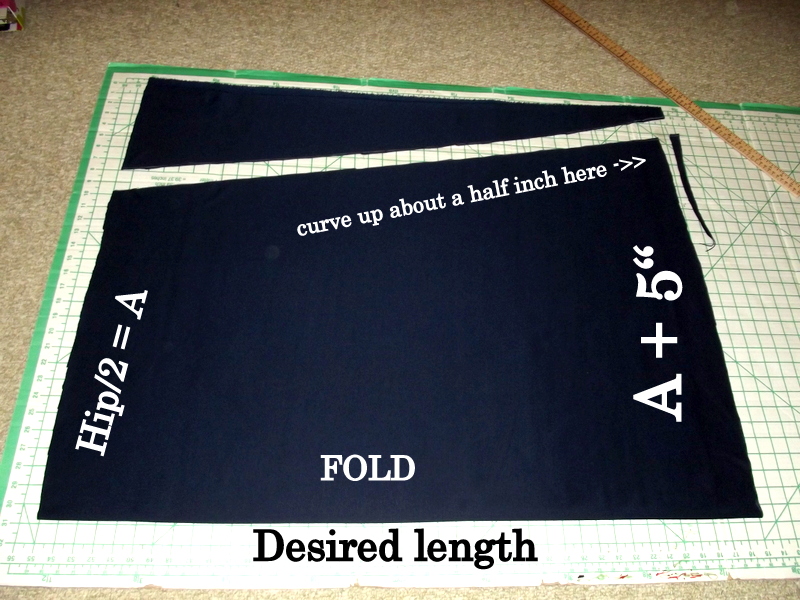
Cut out your waist band like this. (You'll need two!)

Are you tracking so far? I hope so, because you have just four seams and a hem to do before you are done! First, sew up the long side of your skirt. If you don't have a serger, just set your machine to a narrow zig-zag stitch and set the stitch length a tad longer than normal.

Now sew the two waist band pieces together along the curved sides.

Fold it over so that the seam is inside.

Center the seam of the skirt to the back of the skirt. Mark the centers of both the skirt and the waistband.

With the skirt facing WRONG side out, put the waist band INSIDE the skirt and pin at the centers and side seams.

Sew the waist band to the skirt, stretching it slightly as you sew. Make sure the side seams of the waist band are rounded out as you sew, you don't want pointy corners at your hips!

When you get it sewn, it might look a bit rumpled like this. Eeeww!

No worries! A nice generous pat (Don't rub, just pat!) with a hot steamy iron will smooth most of it out, and what's left won't show when you wear it.

After you hem the bottom, do the same thing with the iron to tidy it up a bit. Now, wasn't that just the easiest thing you've ever made in your life?!

Don't blame me if you get hooked on them, and end up with a closet full of them!...like a certain someone I know! Oh yes, and did I mention these make the. best. maternity skirts EVER??!!
Here are some other maxi skirt variations you might have missed that I've done in the past.
Have a happy week!
Nahum 1:7 The LORD is good, a strong hold in the day of trouble; and he knoweth them that trust in him.

I wish I had a sewing machine. I would probably make one in at least 5-10 colors/patterns. I love a good maxi skirt!
ReplyDeleteVisiting from the my girlish whims link up party today, Happy Halloween.
xo,
LindsayJEveryday.blogspot.com
Hi Lindsay, Did you get yourself a sewing machine?? Gurlfriend, check out Craigslist to purchase one. You will find a great buy on there. If you have never purchased from there before let me know & I will tell you what to do to be safe & get a great deal. ijs
Deletei wish i knew how to sew i would defiantly make this. thanx for the tutorial
ReplyDelete-Maria @mommyandthetrouble2s.blogspot.com
I just made this super cute maxi in an avacado green color. LOVE LOVE LOVE it!! Can't wait to wear it to work (I manage a tanning salon) - I'm always looking for comfortable alternatives to the reg jeans/t-shirt, and I've worn yoga pants way more than I care to admit!
ReplyDeleteI love this, thanks so much for sharing!
I have 2 questions.
ReplyDelete1. Do you need to add a seam allowance or because its knit, just measure it exactly?
2. If I am using a striped knit material, that I would like to match up, do I curve up 1/2 inch from hem or curve down 1/2 inch at hip?
Thank you!!
Pie,
ReplyDeleteI just measure it exactly. However, if you typically use a wide seam allowance, I would add it in. I would also still curve it up at the hem. It shouldn't affect the stripe matching. I hope your skirt works out well for you!
Abby
Love the skirt! I'm a little confused about some of your abbreviations. Hip/2=A what does the 2 mean? On the waist band Hip/2-2" is that the hip measurement minus 2"? I hope that wasn't clear as mud. Thank you.
ReplyDeleteHi! This means Hip-Measurement devided by 2 minus 2". Ok?
DeleteHi!
ReplyDeleteThank you for this great tutorial! Yesterday I found it and late in the night I had a new skirt.
Great!
Look: http://bysusuko.blogspot.de/2013/05/einfacher-jersey-rock.html
Greetings from Berlin, Germany,
Susana.
Love it i can't wait to buy my sewing machine <3
ReplyDeletehttp://ruby--x.blogspot.co.uk/
Thanks!
ReplyDeleteVery good information, thank you very much by the article and the quality of your Web site. A greeting from Chile.
ReplyDeletealternative clothes
Hello. I love your posts, I am slowly trying to take in every word. Thank you.
ReplyDeleteI know this sounds a bit stupid, I am a novice, but with the waist band, is the curved edge on both sides and do you sew both pieces directly together to make one piece with curves on both sides and then join the curves to each other? Oh dear. My brain broke. Thank you.
Ooooo, tell me how to make this as a maternity skirt!!! I have been poring over maxi tutorials with my complete lack of sewing no-how hoping I could figure out how to make that adjustment myself. I would love love to death whatever advice you could give me on this.
ReplyDeleteI'm coming back to this tutorial after several years! Love it.
ReplyDeleteLighting Fixtures: The selection of lighting fixtures complements the overall design aesthetic, providing both functional illumination and visual interest. However, consider verifying fixture placement and brightness levels to ensure consistent lighting coverage across all areas
ReplyDeleteFluted glass adds a touch of elegance and texture to both residential and office interiors. Its vertical grooves provide visual interest while maintaining privacy and allowing light to filter through, making it a stylish choice for partitions, cabinet doors, and decorative accents.
ReplyDeleteJust installed ATS Rhapsody's Veneer Shutters and the difference is stunning! The real wood grain adds such warm, natural elegance to the room. They are not only beautiful but also incredibly functional for controlling light. A truly luxurious and timeless upgrade for any home
ReplyDelete