So, I sorta, kinda, finished up the little girls' room...as much as I'm going to do with it right now anyway. I'm not entirely satisfied, but until I get some better ideas, here is what it looks like now. As I've explained before, their room is an open loft. It's sloping roof makes it extremely difficult to fit furniture and it also has no closet. Here is what is looks like from the stairs looking in.
Do you remember this awful painting I found at the thrift store?
Here is what is looks like now. Just as a side note, never try to make a chalkboard out of a painting that has really thick paint strokes on it. Even after about five coats of chalkboard paint, I can still see the outline of those awful geese! My two year old doesn't care though, she thinks its great that she can color anytime she want now.
Books and toys go here. If all the toys don't fit, they get chucked out or donated. I know, I'm a mean momma. You can see how I made the book shelves in this post. My mister made the toy shelves for me.
I showed you in the last post how to make a rocking chair cushion. The rocking chair was a garage sale find.
This is the baby's crib. You can see how I made the quilts, sheets, and bed skirts for both beds in this post and this post.
I made the embroidery hoop mobile and show you how in this post.
The shelves just have a few random things on them. The pink frame used to be gold colored and I painted it and then dry brushed with white. The black and white picture of the two little girls in it came from The Graphics Fairy. (Love LOVE that site!)
Here is the clothes situation which I explained here. This is the part I'm not entirely happy about...it still looks cluttered to me. Its also pretty annoying when a certain little someone decides to "help momma" and empty out a shelf of clothes into the dirty clothes hamper! It would really be lovely to have it all put away out of site. I don't have a better solution at the moment though...I would love any suggestions! The dresser is going to get a pretty paint job at some point in the future.
I added some sticky mirrors to the wall around the ABC art I made here. I've never met a little girl who didn't like to look at themselves...needless to say this was a huge hit! Yes, the "Z" on the canvas is still backwards...I'll fix it...someday.
And last is the toddler bed which was also a garage sale find and repainted by me. My mom made the super cute polka dot crocheted blanket at the foot of the bed.
So there you have it...a little crowded, but just right for the little girls at this stage. Funny, I started out thinking I was going to have a bird theme in this room. I don't think there is a single bird in it! Oh well, I guess the moral of the story is to just go with what works!
" Draw nigh to God, and he will draw nigh to you." James 4:8
Linking to:
TaterTots and Jello
Showing posts with label baby room. Show all posts
Monday, August 22, 2011
Wednesday, July 13, 2011
Quick and Easy Bow Holder
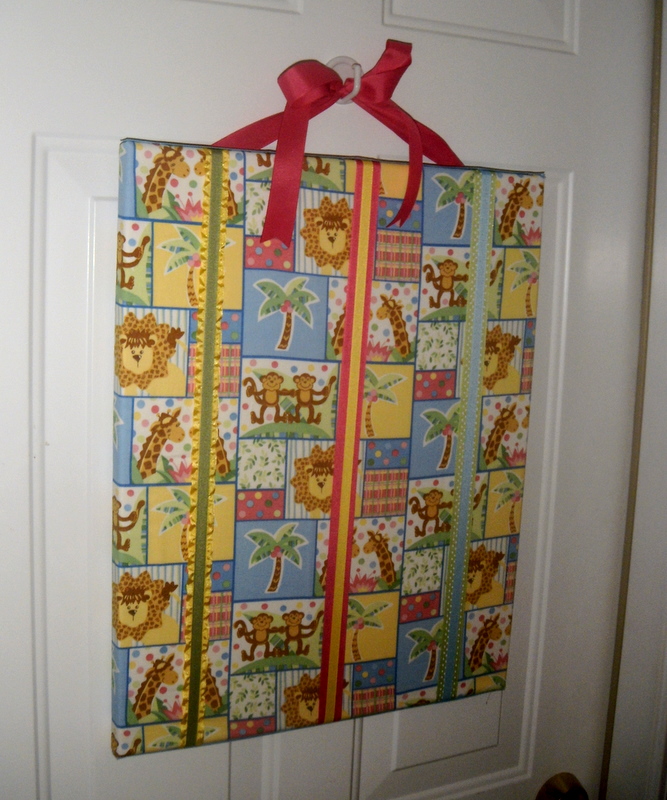
There are a thousand different ways to make a hair bow holder. I chose this route, because it was simple and fast. I picked up a 16"x20" canvas to start.
I used left over fabric from making the girl's bedding to cover it.
I just stapled it along the backside.
I cut strips of ribbon, a narrow ribbon placed over a wide ribbon, and stapled them on as well.
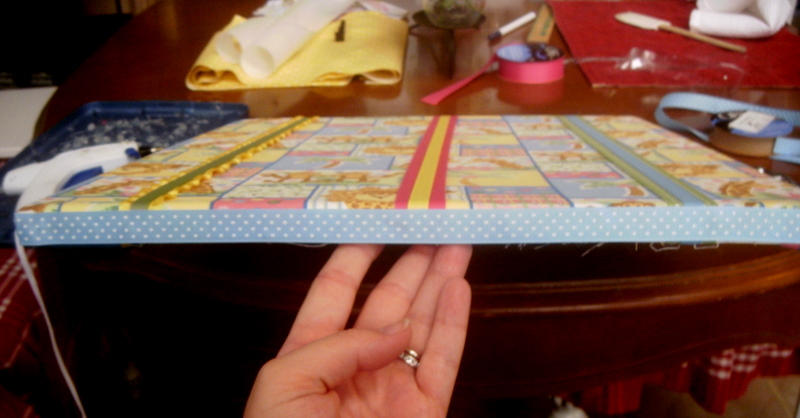
Because I was using left over fabric, it was a tad too short on the ends to cover the canvas. I simply glued a strip of ribbon around the edge to cover this little problem.
I glued two strips of ribbon to the back to tie it to a hook with. Very simply done!
After loading it down with all the little lady's hair bows, I'm thinking I might need to make a sequel!
Let this be a warning to you if you feel so inclined to learn how to make hair bows! You might find them taking over your house!
"O Lord, how manifold are thy works! in wisdom hast thou made them all: the earth is full of thy riches." Psalm 104:24
Linking to:
Goodbye City Hello Suburbs
Fabric Bows and More
Organize and Decorate Everything
My Girlish Whims
Tuesday, June 21, 2011
Baby Mobile
I think I'll add one or two hoops more as I come across them. I'm pretty satisfied with it for now though.
Linking to:
Tuesday, June 14, 2011
How to create a closet
Our house is an A-frame house. The little lady's room, soon to be her's and her sister's, is the loft. It was not meant to be a bedroom so it does not have a closet in it. Also the A-frame structure makes it very tricky to furnish it because the roof slopes down so low at the sides. This room has been a huge challenge for me! I've scoured the Internet for storage ideas and decorating tips for this type of room, and really haven't found a whole super lot of anything helpful. Up until now, this has been the little lady's "closet". (excuse the mess, I didn't tidy up before snapping pictures)
It's a tension bar inside of a short bookcase with the shelves pulled out. It's worked decently, but with baby sister on the way I needed a better system. I did not want two of these plus two dressers in such a little room. It would be a forest of furniture if I did that! Thankfully, I came across these at a garage sale.
They are wire cubes that you can build anyway you like with plastic connectors. I found three sets for $20! The original store price is $20 a set so I definitely got a great deal! My hubby put them together for me in one long unit.
I put bars through the wire to hang their dresses.
Storage totes along the bottom hold all their fold up clothes, so that dressers aren't needed. I cut out and glued foam numbers to them just to pretty them a bit.
Buckets along the top hold socks and such.
It still doesn't look as lovely as it would if there was actual doors hiding it all, but I'm sufficiently satisfied that it is neat and organized. At least it is one clothes area as opposed to four different pieces of furniture! Thank the Lord for garage sales! =)
linking to:
Thursday, April 28, 2011
Screws for the crib!
If you read this post, you know that I recently purchased a crib at a garage sale, repainted it, and then realised I had forgotten to get the hardware to put it together when I purchased it! Aghh! Leave it to me to do something so brainless!
Well my hubby came to the rescue, figured out all the screws needed and put it together for me. Here is what it looks like all together.
I decided to use it as a toddler bed for the little lady and let the new baby have our old crib. Their room is actually not a bedroom, but an open loft. This bed is up against the rail, that is why you see windows behind it. The walls are yellow and the crib is a grayish blue. I distressed it to bring out the details and then coated it with poly acrylic to keep it from scratching or chipping.
I like how the back looks a little like bead board.
I normally spray paint everything, but I had a specific color I wanted for this, so I hand painted it. These little bars take fifty million years!
Well, now I just need to get sewing bedding for both cribs. That is, if my sewing machine decides cooperate! It decided it hates me yesterday. I just got it in December and have never had a problem till yesterday. It works fine and then out of no where it sounds like a jackhammer and the needle pops! I tried a new bobbin, new roll of thread, adjusting tension and anything else I could think of. If any of you have any suggestions I'd be so grateful!
I'm working on a massive project that I can't wait to show you! Sheesh! That's a long project two weekends in a row...I must be getting more patience in my old age or something! =)
Linking to:
Miss Mustard Seed
Tuesday, January 11, 2011
baby steps in the nursery
I didn't make as much progress as I'd hoped in the little one's room last weekend. She got a nasty cold and we got some super cold rainy weather. Neither is very conducive to painting or much of anything that requires two hands. However I did manage to get two book shelves up that I finished last week.
I saw the idea for these here. I didn't use her directions but the concept is the same. Basically you want two boards to form an "L" shape with a smaller board forming a lip in the front. I nailed mine together because I like fast and easy, but it would be more professional to screw them together. The idea is for it to look like this when you are done.
I made two, sanded them and then painted them white. I would suggest using wood filler to smooth out any knots that might be in the wood. I didn't think of that until I was done, so mine are a bit, er, rustic, looking. Then all that needs to be done is to hang with your choice of hardware. They have made a world of difference already in a room that looked like this.
They are just right for little hands to take one and also to return it. Although we are still working on the return part! The sides are just open, I don't think it would be too hard to add a small block if you needed to.
These pictures make the walls look very yellow, its a lot softer of a yellow in person. At any rate, these cost just under $10 a piece to make. I'm loving them! Here's a peek at whats coming soon for the rest of that mess in there.
Hope to have more progress to report soon!
I saw the idea for these here. I didn't use her directions but the concept is the same. Basically you want two boards to form an "L" shape with a smaller board forming a lip in the front. I nailed mine together because I like fast and easy, but it would be more professional to screw them together. The idea is for it to look like this when you are done.
I made two, sanded them and then painted them white. I would suggest using wood filler to smooth out any knots that might be in the wood. I didn't think of that until I was done, so mine are a bit, er, rustic, looking. Then all that needs to be done is to hang with your choice of hardware. They have made a world of difference already in a room that looked like this.
Doesn't that make your eyes start twitching and your hair curl? I. hate. mess. So now we at least have this small spot of order.
They are just right for little hands to take one and also to return it. Although we are still working on the return part! The sides are just open, I don't think it would be too hard to add a small block if you needed to.
These pictures make the walls look very yellow, its a lot softer of a yellow in person. At any rate, these cost just under $10 a piece to make. I'm loving them! Here's a peek at whats coming soon for the rest of that mess in there.
Hope to have more progress to report soon!
Subscribe to:
Posts (Atom)