

See? You can't look at all those pretty colors and not feel better about Mondays. I figured since I've been sewing the skin off my fingers making these for my shop, I'd show you how to make one yourself!

Before we begin, the bags shown above are actually two slightly different sizes. I'm giving you directions to make the largest size one. (the orange one) It measures 17 inches by 14 inches when completed. You will need 3/4 of a yard of an outer fabric and 3/4 of yard of lining fabric. I like using canvas, or heavy weight fabric best, but on one, I used satin for the lining.

It makes it feel a little fancier, so it all depends on the look you want.


Lets start with the front first. You should have cut two pieces that look like this. (I like to round out my corners, but that is up to you)

We want to sew some piping along those straight edges to really make the ruching pop. Here is a trick for piping. Sometimes you can't find the color you need (as in, you drag your two babies to THREE stores looking for basic colors and you can't find them!!), so you can actually use bias tape to achieve the same affect. Just fold it in half and sew down very close to the edge.

So that to both pieces. Make sure you are sewing it onto the RIGHT side of the fabric. Now take your long strip of fabric that you cut. Sew a gathering stitch down each side of it. When you gather it, try to do both sides equally, so your ruffle will look straight.

Make sure you ruffle equals the lengths of the other two pieces.

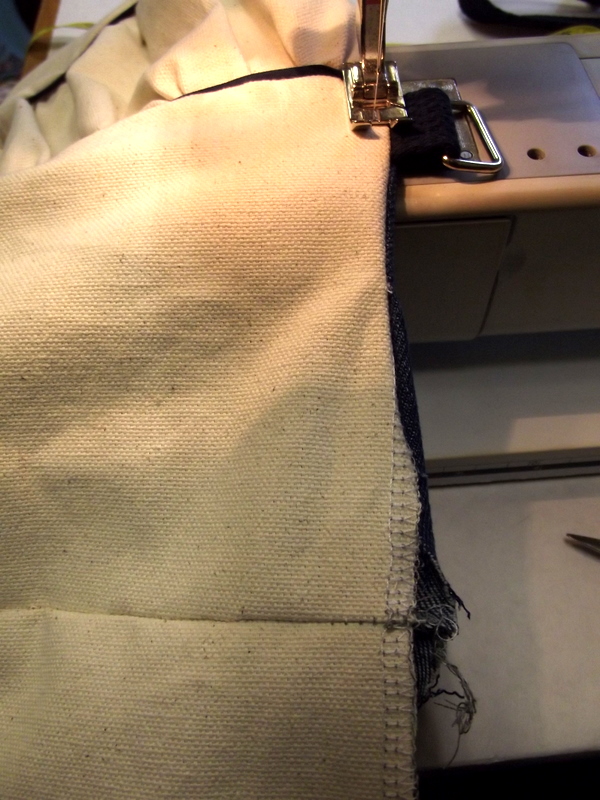
Now, right sides together, sew the ruched strip and the side pieces together. It should look like this.


Now for the liner! Take two pocket pieces, sew them right sides together. Leave a gap so that you can turn it right side out when you are finished.

Turn it, and top stitch across the top, closing the gap as you go.

Center the pocket onto one side of the lining and sew it on. I sew a line down the center to make it into two pockets.

Do the same for the other side. Sew the lining pieces right sides together.

Slide the lining into the outer, RIGHT sides together.

Cut four pieces, 2.5 inches long, of webbing or cotton strap. You can also make your own strap out of fabric. You will also need four rectangular rings, or D-rings.

Loop the strap through the ring like so.

Slide the looped ring in between the layers of the bag with the raw edges sticking out. I used the ruched section as my guide, and put the straps on either side.

Eeesh! Someone needs to tell that girl to fix her nails! Ick! OK, moving on...once you have the loops all pinned into place, sew around the top of the bag. Make sure to leave about six inches open so that you can turn the bag right sides out. Flip it all out so it looks how it should.

Now top stitch around the top, closing up the gap as you go.
Last step! Cut two pieces of strap 26 inches long. Loop the ends through the rings and sew in place. Don't forget to fray check the raw edge!

Now, my dear, you have a bag! Hurray!

The sky is the limit for the fun combinations of colors you can come up with!

If you make one, I'd love to see it!
P.S. Please only use this for personal use, this tutorial is not intended to be used to make items to sell. Thank you!
P.S.S. We are having a GIVEAWAY on Wednesday that you will soooooooo not want to miss, come back to check it out!!
P.S.S.S. Have a great week!! =))))
Luke 19:10 For the Son of man is come to seek and to save that which was lost.

linking to:
The Southern Institute
Boogieboard Cottage
Between Naps on the Porch
Singing Three Little Birds
Not Just A Housewife
Suger Bee Crafts
Chef in Training
Home Stories A to Z
Sew Woodsy
Organize and Decorate Everything
Sew Much Ado
Someday Crafts
My Girlish Whims
The Freckled Laundry
My Simple Home Life
Super cute bags! Thanks for the Tutorial!
ReplyDeleteThat's a great tutorial - thank you so much for sharing! I love the stripy fabric!
ReplyDeleteSarahx
Amazingly Bag u prepaid information that you have shared.
ReplyDeletephp web development
What a neat tutorial. Thanks so much for sharing. Great etsy shop, too. Stopping by from Not Just a Housewife. Hope to see you around www.bearrabbitbear.com soon!
ReplyDeleteThese are fantastic! You're tutorial is wonderful! I think the orange one is my favorite!
ReplyDeleteI hope you'll stop by and link up: http://www.serendipityandspice.com/2012/03/manic-monday-linky-party-9.html
-Melissa
Super cute! I'd love for you to link it up to Crafty Cousins!
ReplyDeletehttp://crafting-cousins.blogspot.com/2012/03/what-i-wore-sunday-week-7.html
~Natalie
Holla! We're your newest followers! :)
awesome job, I am still too intimidated to try that with my sewing machine.
ReplyDeletewww.newlifeovernight.blogspot.com
Thank you for the tute! This is my next project! Can;t wait to get started. I'll take a pix when it's done!
ReplyDeleteHello!
ReplyDeleteThank you very much for sharing this tutorial!
I made my version, and I have posted on my blog linking your post, I leave the site if you fancy to her.
http://www.creativa4all.es/2013/10/costura-bolso-y-neceser-flower-power/
Thank you,
Ada
I see that you would like for these not to be made to sell. I am wondering if it's okay if I make one to donate to be auctioned off for my daughters nursery school?
ReplyDeleteRebecca, that would be no problem at all!
Delete