Showing posts with label women's clothing. Show all posts

Monday, April 8, 2013

Anthro Inspired Maxi Skirt Tutorial


     Back in the day, before we bought this old ramshackled house of our's, that's taken over every spare minute of my time, I used to spend every extra second I could find sewing something. All this painting and whatnot has caused my wardrobe to suffer severely! (Ok, actually not really. I have way more clothes than I need.) Anyway, I did a bit of online shopping looking for some things I might like to freshen up my clothing selection for spring. My idea of "shopping" is to find something I like, and then figure out how to make it myself for a fraction of the cost. I came across this skirt, and I quite liked its casual scrappy look.

Niguel Maxi Skirt

     I used it as my inspiration to make this version. I used a denim-like jersey knit, and made a  basic maxi skirt (tutorial here) with some scrappy goodness added to it.


      If you'd like to give it a try, see my maxi skirt tutorial for what you should cut out. In addition to the waist band and the actual skirt, you'll need to cut out several long strips about a half inch wide. 


      Spread the skirt open and start laying out the strips in the design you like pinning as you go. I flipped my strips wrong side out so that the fabric would contrast, but you don't have to do that.


     I pinned the strips all in place, and did not trim the ends just in-case I wanted to rearrange while sewing.


      I sewed them on, starting front and center, and sewing down the center of the strips. I used a long, narrow zigzag stitch so that the skirt would retain all of it's original stretchyness.


      If you aren't using a walking foot on your machine, you might find that  the fabric wants to bubble and bunch a bit as you sew the strips down. You can fix that by putting your needle down, and lifting your foot to ease out the fabric.


       Once your strips are all sewn on, sew up the back seam. I matched my strips at the seam, but I don't think the Anthro version does, so anyway you like works.


     Finish up with the waist, hem, and press.


       Mine cost me around $10 and it couldn't have been more simple to do.


     Among other things, I am bound and determined to make a decent button down shirt for myself that actually is long enough in the arms and torso! Except, I've never done one before...so we'll see how that goes. Have you done any spring shopping lately? What will you be adding to your wardrobe?

1 Peter 1:24,25   For all flesh is as grass, and all the glory of man as the flower of grass. The grass withereth, and the flower thereof falleth away:  But the word of the Lord endureth for ever.
Pin It

Thursday, November 1, 2012

Sweater Knits and why you should love them!

     I've discovered something just grand! As I have mentioned before, I'm a big fan of shopping local for fabric...I like to see it and feel it, before I buy it. That is a handicap in it's own way, because fabric stores don't always pick fabrics to sell that I happen to like! (or that are very current colors and prints!) But, this year, fabric stores are carrying a much larger selection of sweater knits than I've ever seen out before in previous years. So why is this so earth shattering??? Well my dear, sweater knits mean that you can sew anything you can buy in a store, all year long! From scarves to cardigans to sweater dresses...the sky is the limit! Fabulous, no?! To illustrate, here I have a sweater knit skirt, and a sweater knit top that I made myself. Super easy, super fun!


      Excuse the bad picture and apparent broken ankle...I didn't have time to fuss with pictures, and my ankle is in fact, not broken. So here's the deal with sweater knits...they are just like any other knit. If you've ever made anything from any stretchy knit, the same rules apply to sweater knit. Use a serger or a zigzag stitch, a walking foot is really helpful, and pat with a steamy iron when you are done. For a skirt or a dress, I would highly recommend lining it. A lining will help stabilize the sweater knit from stretching out too much as you wear it, and it will also alleviate the need for a slip.
     You know what I am dying to make with sweater knit? Leggings! How cute would that print that's on my skirt be on leggings with a grey tunic dress?? I see a new project in my future! Have you made anything with sweater knits? Did you like it?
P.S. I used the same method as this skirt to make the above...if you want to make one too!

Hebrews 13:15   By him therefore let us offer the sacrifice of praise to God continually, that is, the fruit of our lips giving thanks to his name. 
Pin It

Sunday, October 28, 2012

Simple Sewing - Knit Maxi Skirt Tutorial


      I was going through my posts in order to update my tutorials page, and I discovered something pretty funny. I've never ever made a tutorial for the one piece of clothing I make the most! I call them my "pj skirts" and I wear them. ALL. THE. TIME. because they are just that comfy. I probably have at least 15 of these skirts. Ya I know, rediculous.  This skirt is not fancy, it is just your basic, knit maxi skirt with a fold over yoga waist. If just know how to turn your machine on, and sew a straight line, you CAN MAKE THIS!
      There are probably a million tutorials out there for this type of maxi already, but here's my take on in it. First off, shop for some knit. You'll need a yard and a half. My opinions on knit are: jersey is great for summer, ponte roma knit is perfect for winter, don't use rib knit, any knit with 3-5% Spandex in it is fabulous! At any rate, pick a knit that holds its shape well...saggy skirts are not cute.
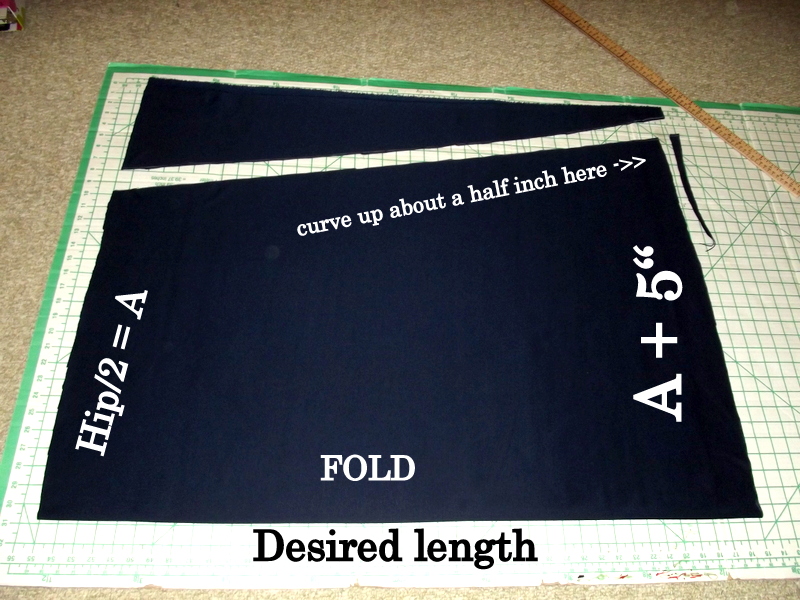
       Now, we cut out our skirt. Lay it out folded, just as it is when it comes off the bolt. You'll need to know how long you want it (NOT including the waist band...waist band will add 8-4 inches to length) and how wide your hips are. Cut out your skirt using the following guide.


       Cut out your waist band like this. (You'll need two!)


       Are you tracking so far? I hope so, because you have just four seams and a hem to do before you are done! First, sew up the long side of your skirt. If you don't have a serger, just set your machine to a narrow zig-zag stitch and set the stitch length a tad longer than normal.


        Now sew the two waist band pieces together along the curved sides.


       Fold it over so that the seam is inside.


      Center the seam of the skirt to the back of the skirt. Mark the centers of both the skirt and the waistband.


      With the skirt facing WRONG side out, put the waist band INSIDE the skirt and pin at the centers and side seams.


       Sew the waist band to the skirt, stretching it slightly as you sew. Make sure the side seams of the waist band are rounded out as you sew, you don't want pointy corners at your hips!


      When you get it sewn, it might look a bit rumpled like this. Eeeww!


      No worries! A nice generous pat (Don't rub, just pat!) with a hot steamy iron will smooth most of it out, and what's left won't show when you wear it.


      After you hem the bottom, do the same thing with the iron to tidy it up a bit. Now, wasn't that just the easiest thing you've ever made in your life?!


       Don't blame me if you get hooked on them, and end up with a closet full of them!...like a certain someone I know! Oh yes, and did I mention these make the. best. maternity skirts EVER??!!
      Here are some other maxi skirt variations you might have missed that I've done in the past.

  1. Shirred waist maxi skirt tutorial
  2. Hi Low Maxi
  3. Chiffon Maxi Skirt
  4. Flat Elastic Waist Maxi 
      Have a happy week!

Nahum 1:7   The LORD is good, a strong hold in the day of trouble; and he knoweth them that trust in him. 

Thursday, September 27, 2012

DIY Your Fall Wardrobe

      It's Fall! It's time for pumpkin spice coffee, boots, and warm colors. Too bad I'm still having to use my imagination to get that Fall feeling here in the sunny south. Ah well, we'll get there...around December or so. Anyway, I though I'd show a few seasonal updates I've made to my shop. Each photo is numbered, and below the pictures are the links to the tutorials so you can make you're own! Keep in mind, these particular items are just updates of old tutorials. For a few items, the tutorials are yet to come...keep an eye out!


  1. Blue Sequin Headband
  2. Blue and Burgundy Floral Headband
  3. Burgundy and Gold Sling Bag
  4. Blue and Burgundy Floral Top
  5. Khaki Maxi Skirt with Side Slits - Tutorial to come
  6. Drop Elastic Waist Dress
  7. Silver Sequin Clutch - Tutorial to come
  8. Brown Suede Clutch - Tutorial to come
  9. Black and Silver Chain Headband
  10. Burgundy Turban Knot Headband
  11. Asymmetrical Hem Striped Skirt
  12. Sparkly Cream Gathered Dolman Sleeve Top
  13. Yellow/Brown Ruffled Scarf

     Like I mentions above, everything is available for purchase via my shop, and the two tops are available at AJ's Boutique. I'd love to do a blazer as well, but right now I just don't have the time. Preparing to move while running a shop, with two little ones in tow is taking just about every second for the present. Have you been doing any wardrobe updates for the new season?

1 Thessalonians 5:24   Faithful is he that calleth you, who also will do it.

Monday, September 17, 2012

Simplified Gathered Sleeves Tutorial


       Well this post is rather late today...it's raining, it's Monday, enough said. So now then, let's chat about sleeves! Changing up the way a sleeve looks on a top or dress, can completely alter the over all appearance of the style. It's a simple way to make five of your favorite shirts, and nobody to ever guess it's the same top!


       A gathered sleeve is simply done by adding width to the shoulder portion of the sleeve. I have added width to the wrist portion of the this sleeve as well, so it is a very gathered sleeve. It can be as little or as much of a gather as you prefer. If you have a pattern to a top you like, you can alter it super easily by adding in space down the middle.

         This is how I do it, without using a pattern. Start with a cut out shirt.


     Take your cut out shirt, and line it up the shoulder with the fold on your folded fabric. The fold is always at the top of the shoulder, so that the seam will be in the underarm. For this sleeve I left a two inch gap between the fold and shoulder. If you wanted a less dramatic gather, you would only leave a half inch or an inch. Try to spread out the arm hole so that is a gradual curve.


     Trace the arm hole onto the fabric. Decide how long you want the sleeve to be, and measure down the fold that amount. This is where you will mark your lower arm hole.


      I wanted a gathered wrist, so I make my lower arm hole to be nine inches long. (For a total of 18 inches when it is unfolded)


     Now, I connect the dots between the two lines I have marked.


       When it is cut out, it looks like this. The curve of the arm hole should be very smooth.


     To sew it to the shirt, first sew the shoulder seams.


       Sew a gathering stitch across the top of the sleeve. Gather the sleeve so that is matches the arm hole.I kept my gathers all in the center, but you could do across the entire top of the sleeve if you wanted.


      Open your shirt out, wrong side facing up. Match the sleeve into the hole. I pop a pin right at the center just to make sure I keep it centered as I sew it.


      Sew the sleeve to the shirt.


     Lastly, sew from the wrist, all the way down the side to the hem of the shirt.


      And you are left with a lovely gathered sleeve! I used elastic as I hemmed the wrist to achieve the gathered wrist.


     It's hardly any harder than doing a regular sleeve, and is certainly worth the tiny bit of extra effort!

     
      I hope that all made sense! This shirt is part of my Fall collection which I am putting into my shop this week, and is also available locally at AJ's Boutique. Don't you just love Fall colors and prints??!! I do, and I'm dying for it to cool off around here so it will actually feel like Fall!

 Philippians 4:19   But my God shall supply all your need according to his riches in glory by Christ Jesus.

Wednesday, September 12, 2012

Gathered Dolman Sleeve Top Tutorial


     I've mentioned before that I absolutely love draping on clothing. One easy way to achieve the effect of draping, without having to mess with tons of extra fabric, is to use gathers. I've done it here on the front panel of this shirt, just along the shoulder seams. 


      This is a very simple top to make, and here is how you can make your own. I used a yard of very lightweight sweater type fabric, that had some fun sparkle to it. (I told you I planned to contribute to the Fall sparkle trend in full force! Mmmm...love sparkles!) Fabric comes off the bolt, already folded in half. I cut a piece the length I wanted for the top (29 inches). Then I cut along the fold to create two separate panels of fabric to work with. 


       Now, you need to plug in your own measurements, following this guide. Measure the widest part of your torso, usually the bust, and use that for the width.  (If your fabric is not very stretchy do not subtract the half inch from "A".)
A = width/4 - .5"
B = A + 3.5"
C = A + 2"
      You need to cut out the front of your shirt like this. It may look kind of complicated with all the numbers, but it's really not. Just measure it all out, and then connect the dots!


         The back of the shirt is the same, with the exception of the widths. The top is more narrow than the top of the front.


      Ok, so if you are still tracking...it's time to sew it together! Gather the the front shoulder to match the width of the back shoulder.  I like to keep the gather right by the neck, and not so much on the sleeve.


     Sew the shoulder seams together. There will be a slight difference of shape under the arm. Just line up the fabric as you sew down the side seam. The extra width helps the fabric "drape".


      Lastly, you just need to hem the whole thing. 


     Super simple, huh! 


      This top is available at AJ's Boutique and my Etsy shop in all sizes. If you run into any questions making it, holler at me and I'll try to help! If you pop in next week, I'm going to show you how to make (or you can modify a pattern) a gathered set-in sleeve. 
       So just as a side note, do all three year olds loose their basic motor skills at this age??...mine has fallen down the stairs twice today and seems on a mission to destroy herself lately. If we can keep all teeth and appendages intact for the next year it will be a miracle!

2 Corinthians 9:7   Every man according as he purposeth in his heart, so let him give; not grudgingly, or of necessity: for God loveth a cheerful giver.