Showing posts with label shelving. Show all posts

Monday, April 1, 2013

Sewing desk #2 - Ladder style


     So, are you tired of seeing desk/shelving projects around here yet? My work shop room is just about situated the way I want it, so this should be the last one for a little bit.


     I decided to move my little industrial style desk to a different spot in the room and put my serger on it instead of the sewing machine. Therefore, a new solution was needed for the sewing machine. Enter two old wooden ladders. One I found in a closet in this house when we moved in, the other I found at a junk store a while back. Happily, they were the same height and perfect for this project.


      I laid a board across the top and screwed it on from the bottom side.


     I dry brushed it with white, mint green, a bit of orange, and brown.


     I painted a few scrap boards to add some more storage options.


      I already had the chair on hand, which was the perfect height as well.


      Oh, and check it out! I finally got around to painting that cinder block wall to match the other one! While this desk may not be everyone's style, it fits the ticket perfectly for me... sturdy, simple, non-generic, and quite functional. I adore it. (Plus it was free to make, so that's always a major plus!)


       Of course, the reason I needed to do this project, was that I had two little Easter dresses that needed sewing...which may have not been finished until five minutes before walking out the door Easter morning...


      ...and my little girl's were just as pretty at two little robin's eggs...but, maybe I should consider not procrastinating next year...but, that's a different tale for a different time.


   Psalms 37:39   But the salvation of the righteous is of the LORD: he is their strength in the time of trouble

Tuesday, March 12, 2013

A scrappy wall storage unit - My first building project


      Power tools and I have never been friends. Not too long ago, I instructed my mister to pick up a pack of screw drivers at the hardware store...and he came home with a new drill instead. I was not happy. I don't like drills. I wanted a screwdriver.


     Very reluctantly, my drill and I became friends. I have my inpatients to thank for becoming friends with power saws. I have way too many projects I want to get done to sit around waiting for my mister to have time to cut wood for me. What's a girl to do, but suck it up and learn how to cut wood?


      Originally, I planned to make wall storage along these lines for this wall. (You can read more about my cinder block wall here.)

#DIY Industrial Rustic Shelf Tutorial.

      Turns out, shelves like that, the size I wanted, was not exactly cheap. Have you looked at the price of pipe lately? Maybe I'm missing some important part of pipe shopping, but it's rather pricey. I needed something more along the general price range of free to properly fit my budget.
     Plan B involved scrounging around and using anything I had on hand that could possible be turned into a shelf. I started with these two doors that I pulled out of my kitchen a few weeks back.


      I cleaned them up, and primed and painted them.


      Next up I made a long shelf using some 2x4's I had left over from another project. I used screws for everything so I can take this thing apart later, if I so desire.


      I cut four legs from a 4x4.


       At this point I dragged everything inside to assemble it all. The four legs I screwed onto the shelf, essentially making a long bench.


     I screwed the doors to the "bench" along the back. (Uh hum, so ya, I maybe skipped painting the back of the doors. Perfection was never my stongest asset.)


      I decided to my doors needed more stability, so I added 2x4 scraps to the front connecting down to the main shelf.


      I made another shelf using scrap board that actually was originally in this room behind the paneling I pulled out.


     Using brackets I had laying around, I added a few more shelves. An old ladder, a former pigeon nesting box, and crate helped round out the storage options.


 I couldn't help myself and added a little color by dry brushing random paint samples on the boards.


       And what will I do with these super cute shelves? Why, use them for storage, naturally.


      I can't stand pawing through totes, smashing everything to bits, looking for the one piece I need. Now, I don't have to!


       I can just "shop" my wall. This room is my work/sewing room, and I can't think of what "art" I'd rather look at while working than loads of random textures and colors.


      Besides, if I ever wanted to have a garage sale...all I'd have to do is open the front door. =) Seriously though, isn't knowing what you have so much nicer than having it all tucked away in some dark corner?


      And before you kindly suggest I might have hording tendencies...let me just remind you, there are only two rooms in my entire house that have been fully furnished. (See the entry here, and the guest bathroom here.) These shelves will clear off quite a bit as each new room is fully finished.


      In the mean time, I have decided wood working isn't so bad after all! It's not much different than sewing really...axcept fabric is more forgiving and doesn't give me a back ache.


        The only thing I specifically purchased for this project was the 4x4...making the total cost for my shelves $6.57. Now that's more like it!

Colossians 3:23   And whatsoever ye do, do it heartily, as to the Lord, and not unto men; 

Thursday, March 7, 2013

Closet Built in Shelves Tutorial


     Organization. It's the difference between feeling stressed out in my home, or relaxed. I could get on a soapbox right now, and tell you all the reasons why I am a proponent of an organized home...but I'll spare you. I know some folks actually work better with everything in a jumble, organized chaos I believe is what they call it. I married a type like that in fact, and let me tell you, we both have our oppinions about whose working method is better. Mine, obviously.
     Anyway, I'm actually here to show how you can turn any unused closet (or nook) into well organized piece of valuable real estate in your home. You may have a closet that looks like this...the potential for it to fill up and become a major threat to bodily health is almost certain.


      I have two of these closets in my soon to be work shop, and I knew I needed to something about them before they got hopelessly out of hand. The solution was quite simple and inexpensive ($12 to be exact)... built in shelves!


        Music to my eyes! Here's how I did it. First measure the width and depth of your closet. Mine was 46 inches wide and 20 inches deep. You need long boards to across and smaller boards for the side supports. I used scrap wood for the side supports and some very inexpensive press board for the shelves. I cut them down using a jig saw, because that was handiest at the moment. ( Ok, really...circular saws still sorta spook me.)


      My closets are weird. One side of them is cinder block and the other is wood. On the wood end I just screwed the support boards where I wanted them. (hhmmm why yes, there is termite damage on these closets...yet another reason I went as cheap as possible for these shelves. They will have to be gutted and re-built at some point down the road. Thanks termites.)


      On the cinder block side of the closet, I had to glue the support boards. I don't have the tools for screwing into cinder block, so this was the next best thing.


        Just keep adding supports for however many shelves you want.


      I just laid the long boards across without attaching them. I wanted to be able to remove them easily if I ever wanted to use this as a regular closet again.


     I put two shelves in both closets which created a huge amount of storage. One closet holds fabric bolts and remnants.


     The other holds craft supplies and sewing notions.


      An over the door pantry organizer really added to the storage options as well. I'll probably get another one for the other closet, because it's so handy for holding small things.


      Here is a shot of how this room began and you can see the closets I am talking about. I think I will be doing the same thing with shelves to that center nook. I think it will make a great spot for storing all my totes of folded fabric.


      If you missed seeing the other changes so far to this room see here and here. I'm currently working on shelves of a different sort for side walls ... and I am so excited to finish them I looooove them! This room will definitely be my favorite spot in the house when I'm finished.
     So what about you? Do you work better with things tip-top tidy or in organized chaos?

 1 Corinthians 14:40   Let all things be done decently and in order.

Sunday, January 13, 2013

Crate Wall Storage

     Well hello there! How was your weekend? Mine was productive. So productive in fact, that I actually finished something to show you! I know, stunning.


     The only room in this old house of ours that has ever been painted or updated is the downstairs guest bathroom. A very small bathroom I might add.  Somehow a shower, pedestal sink and toilet were all miraculously made to fit in this tiny little room. Needless to say, there is absolutely no space for any sort of storage for all the items that typically a guest might need to find in a bathroom. If there was one thing I learned in my last tiny little home, it would be the art of cramming a lot of stuff into a small space! Although this house is more than twice the size of that one, I'm finding my "small house" mentality is proving helpful with organizing this one. My method is simple, first look up. What can you do with the vertical space? Second, if the storage has got to be out in the open, make it function as decor as well as storage. So here we go, simple wall storage for my little guest bathroom.


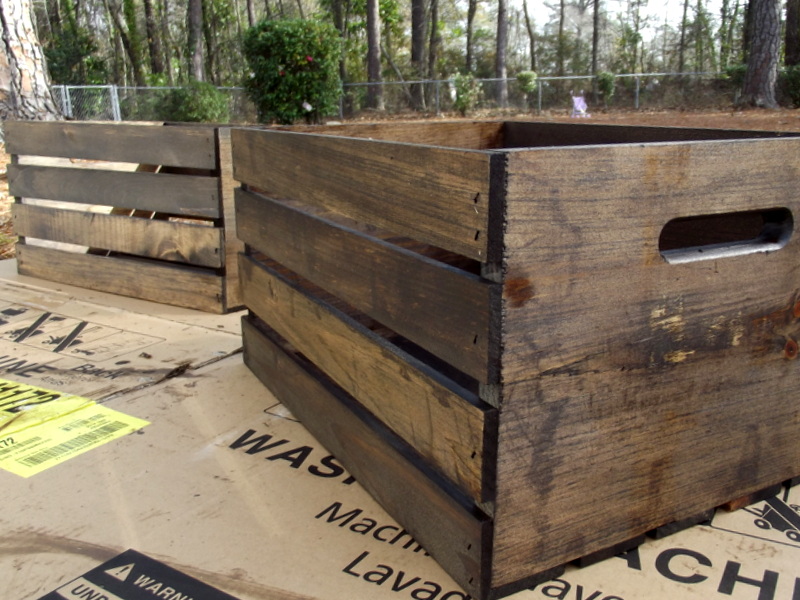
      I picked up two of these crates at Home Depot for $8 each. (Confession: I actually already had about 6 vintage crates I've picked up at flea markets and such that I could have used...but I have a crate collecting obsession, and I couldn't bear the thought of putting the old cute ones in the bathroom. Lame. I know.)


       I stained them with a dark wood stain. I wasn't the least bit worried about it looking perfect, the uneven stain adds to the affect, I think.


      Next, I screwed on some brackets. I found mine at Lowes, I believe.


       I screwed them onto the wall where I wanted them, and that was it!


      I think they are elegantly rustic. Is that a style? Whatever, I like them, and they do the trick just nicely. You know, if you only had one and hung it high enough, you could stick a bar through the brackets for it to double as a towel rack too!


     I'm almost finished with this bathroom, one or two more tweaks to go. The rest of the rooms will go far more slowly I'm afraid, as there is much, much more work to be done in them! Really, just having one room looking pleasant and fresh gives me a boost of energy every time I pass the door. I know the rest of the house will get there with a little time...and the process of getting there is actually pretty fun!


      Enjoy your week!

Psalms 3:3   But thou, O LORD, art a shield for me; my glory, and the lifter up of mine head.