Showing posts with label baby accessories. Show all posts

Monday, July 2, 2012

Boy Carseat

     Guys, its July...as in...this year is half over. Does that shock anyone besides me?? Are you doing anything fun for the Fourth? I got to have my fun last week with friends in town, who we don't get to see very often. I slaved away doing things like going to the beach and other such labors. It was rough. I did manage to accomplish at least one thing though. I did a baby car seat makeover for a friend. She had a purple plaid car seat that needed some work to make it fit for a boy.


       She picked out some super soft minky for the seat, and grey and black polka dot for the canopy. I used the same method of doing it as I did for my carseat makeover in this post. A couple things I did different, was to put the contrasting fabric around the strap holes, and I did not use binding for the elastic casing around the seat cover.


      I won't lie, that fabric around the holes was an absolute pain to do. It took almost as long to do just that as the entire thing...so next go around, I'm thinking I'm sticking to button holes. It does look nicer with that little bit of contrast though.  I used wide ribbon folded in half to hold the plastic piping on the canopy.


     One mistake I did on both mine and this one, was to make the canopy the exact width it needed to be. You actually want it to be about an inch wider, so that you can sew binding on to close up the piping strips. As it was, I had to work around that plastic, and it wasn't as neat as I would have liked. Let's just say, there is a reason I sell clothes and not car seat covers. I do love how much nicer a custom cover looks as opposed to just a store bought regular one. If you've ever done one of these, I'd love to read any tips you have to share in the comments!
      I went and bought new feet for my machine this weekend, and I am SO excited about them! I got a ruffler foot, zipper foot, walking foot, and a rolled hem foot. I'm hoping I'll have lots of new tips and tricks and super cute things to show you from them in the near future! I'm off to play with fabric...have a happy day!

Matthew 10:8  ...freely ye have received, freely give. 
Pin It

Tuesday, April 24, 2012

Random Information Day - DIY Baby Food

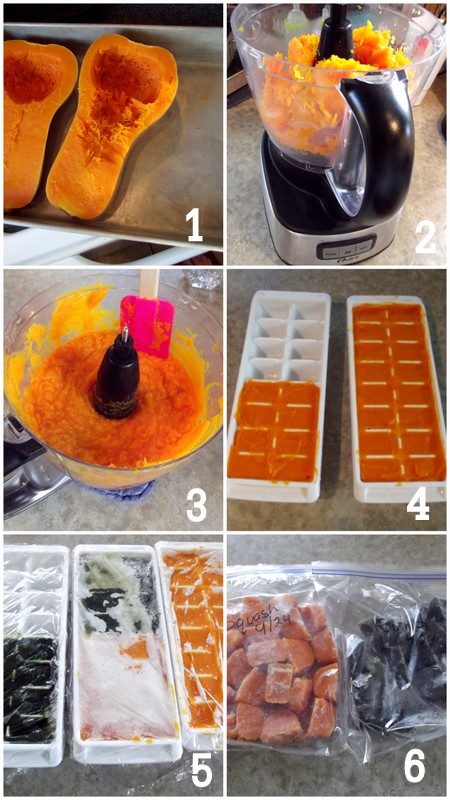
       Ick. I hate change, do you like the new blogger set up? I suppose I'll get used to it. Anyway, so here is a totally random and non-crafty post for you. Do you have a baby? Does your baby eat? Mine does, mostly paper, bugs, leaves, and any other non-edible tidbit she can get her chubby little fingers on...but I do try to get actual nourishment into her little self on a daily basis.  Here's how you can make your own baby food!


       Nothing complicated here...Start with your cooked veggie of choice, puree it, pour it into freezer trays, freeze it, and then seal the cubes in labeled Ziploc bags in the freezer. I've not priced it out to the penny, so I don't really know if it is cheaper than buying baby food. I don't see how it couldn't be cheaper, because a squash like I did here, only costs a few dollars. It makes enough squash cubes to last a good little while. I like doing it this way, because I like to know exactly what I'm feeding my kiddo. It's the real deal, so later when I'll plop that same squash in non-pureed form onto her plate, she'll have no issues eating it.


      The little cubes are a handy size for the small portions babies eat. When I'm going out, I just toss a few cubes in a small Tupperware container and take them with me. They are normally melted by the time I need them. I've also done this exact same thing with cooked chicken, I just added a bit of water to thin it out.
       As you know, cooking is not my thing in the least, but even I find this to be a pretty manageable task. =)


Nahum 1:7 The LORD [is] good, a strong hold in the day of trouble; and he knoweth them that TRUST in him.

Monday, March 26, 2012

Quick and Easy Baby Rompers


        Its been ages since I've sewn anything for the little ladies of the household. These little rompers are super easy to do, and you can even use an dress you already have! If you use a dress, you'll want to make sure its on the long side. I decided I didn't want to continue selling kids clothes in my Etsy shop, so I've got tons of these little dress sitting around. ( You can see the tutorial for how to make these dresses here. )


     I marked out four inches in the center of the dress on both the front and back.


      I sewed narrow elastic around the bottom of the dress, except between the marks.


      Next, I added extensions on the centers, so that it will snap between the legs. Because I made this dress a while ago, I didn't have anymore of this fabric to use. I just used twill tape, and cut two four inch long pieces. I sewed them on, where I had marked earlier.


      Next, add some snaps, and it's all done! You might even manage to get your snaps straight, unlike mine.


       I like ones made from cotton for a dressier look. She has a store bought one made from eyelet which is so super cute. That would be a good fabric choice as well.


        I also made a knit one from scratch. It is just a tube of fabric that is shirred at the top with elastic thread. I did the bottom the exact same way as above. For the straps, I made two tubes of fabric and slid elastic through them.


      The stretchy straps are very easy on the shoulders of busy little people...especially ones who have just learned to crawl. This gal has got places to go, and things to do, every second of the day.


      Off topic, but aren't those chubs just the cutest?! Can't believe how fast she is growing. Sniff. OK, back to the rompers.


      Have fun sewing!

2 Samuel 22:47 The LORD liveth; and blessed be my rock; and exalted be the God of the rock of my salvation
Pin It

linking to:
Home Stories A to Z

Thursday, January 5, 2012

Whale Softie Sewing Tutorial


      I like toys, probably more than my kids. I don't go down the toy isle in stores, not because they will beg me for one, but because I'll want to buy them one. Weird? Maybe. I'll grow up one day. In the mean time, want to make a toy? One that tiny hands can hold...


      ...and has fun loopies to chew on?


      Great! Let's make a whale!


      Here's how. Get yourself a pattern, either by free handing it or printing one off the Internet.


       Trace it onto two pieces of cloth. (I used flannel) Cut out, and sew on two button eyes.


      Cut a few strips of four inch long ribbon.


      Pin your whale, right sides together. Loop your ribbon and pin at the top. Make sure the loops are inside and the ends sticking out.


      Sew all the way around, leaving a space open to flip it right sides out. Flip it out, and you should have this.


       Stuff generously with fiber fill. I stuffed in a few bells also to add a little fun to it.


      Hand stitch the opening closed, and you are finished! Hand it over to a sweet little lady who will then drool, hug and gurgle all over it.


      See? Aren't toys fun?!

1 Timothy 6:6 But godliness with contentment is great gain.

Linking to:
Simple Home Life
Freckled Laundry
Sun Scholars
Tatertots and Jello

Tuesday, December 27, 2011

Drawstring Bag Tutorial


      Well hello! How was your Christmas? Mine was wonderful, and perfect in every way. I've come down with a nasty cold since though, and lost my voice completely. My toddler thinks I'm whispering because I want her to play quietly, and keeps whispering back to me. Haha! I should have tried this ages ago, what a wonderful tactic! Anyway, I sewed myself a new diaper bag while I was on my Christmas bloggy break, and put together a few extra for my shop. They are great little bags, that can be used for a beach bag, diaper bag or whatever you want.


      Changing up the fabric can change it to fit whatever use you want.


      Each bag has four inner pockets to keep things nice and tidy.


       I used nylon strap to make a handle and a strap down the back, for over the shoulder carrying.


     I used heavy weight fabric for both the liner and outside, because I wanted them to very durable. You'll need 2 yards total of fabric. If you use regular cotton, I would put some stiffener or something in between to help it hold up better. I used nylon strap for the handle and back strap, and cotton cording for the drawstring.
     You need to cut out the following pieces, one of both the lining and the shell.
Bag body - 29" x 14"
Bag bottom - 9" circle (I used a pie pan as my pattern)
Pockets- 29" x 8" ( this can be either of the fabrics or both)
     Start with the pockets. Put the two strips right sides together and sew along the top.


     Flip the right sides out, and then top stitch along where you just sewed.


     Lay it on top of the bag liner. Find the center and pin a straight line.


      Measure over 7 1/2 inches and pin another line.


     Do the same to the left of the center line. You should have three pinned lines, making four pockets.


       Sew down each pinned line.


      Fold the lining right sides together, and sew down the side.


      Hold the bag lining open at the base.


      Set the lining circle into the bottom and sew on. I would highly recommend pining it in place first. I was on my sixth bag at this point, so I was feeling rather confident in my mad sewing skills and skipped pinning.


     Once the bottom is sewn on, flip it right side out. Make sure you have caught all the pocket layers around the bottom, and that everything is sewn securely.


       Take the outside piece of the bag, and find the center. Mark where you want the button holes to be for your drawstring, and sew them in. ( you can also use grommets if you don't want to do button holes)


        Fold it over and sew up the side, just as you did with the liner. Cut a strap the length of your bag plus a an inch or so.


      Sew on the bottom circle, just as you did with the liner. Make sure to sandwich the strap in between as you sew.


      OK, almost done! Stuff the outer shell into the liner, making sure both right sides are together.


      Cut an 8 inch piece of strap for your handle. You want it to be sewn on like this.


      Pin it on accordingly, sandwiched between your outer shell and liner.


     Pin around the top, but remember, you'll need to leave a space open to turn it. I usually double pin where I don't want to sew.


      Sew around the top. Turn the bag right sides out through the hole you left open. It should look like this.


      Top stitch around the top, closing up the hole as you go. Now, you need to sew another line about an eighth of an inch beneath that all the way around. Sew another line about an inch and a half beneath that one. This is where the drawstring will go.


      Thread your drawstring through the bag. If you use cording like I did, I found it was easiest to tape off the end of the cord. Stick a safety pin through the tape and then thread it through.


      All done! I know that that's a super long explanation, but it really is a simple bag to make!


       I hope this all makes sense, let me know if you have any questions!


      Thanks for reading and happy sewing!

Isaiah 42:16 And I will bring the blind by a way that they knew not; I will lead them in paths that they have not known: I will make darkness light before them, and crooked things straight. These things will I do unto them, and not forsake them.

Linking to:
Someday Crafts
My Girlish Whims
Sew Much Ado
Its Overflowing
Free Pretty Things For You
Sew Woodsy