Showing posts with label accessories. Show all posts

Friday, October 26, 2012

Fingerless Gloves Tutorial


        Guess what?? It's Friday! As if Fridays need to be improved upon, here's a simple sewing project that will make the day even better! Winter is coming, and who likes cold hands?! Not me! Makes me down right grouchy to be cold! Grab a half yard of cozy sweater fabric, or a nice thick rib knit and you can whip up these gloves in no time!


       The best thing about them? (Besides the fact, you can make them in every color and print under the sun!) You don't have to sacrifice your ability to function, because they are fingerless!

        So here's how it's done. Cut out a rectangle of fabric on a fold with the stretch going width wise. I made mine 13 inches long, and 7.5 inches wide. This makes for a very snug fit, so if you want a looser fit adjust accordingly. Also, if your fabric is not super stretchy, you'll need to add some to the width as well.


       With the wrong side out, sew around the three raw edges. Leave a gap not sewn in the LONG side to turn it right side out. Use a serger or a zigzag stitch on a regular machine. If you have a walking foot, it helps enormously, especially on sweater type fabrics! ( I used white thread so you could see what I did, I would recommend matching the thread to your fabric so it doesn't look tacky!)


      Flip it right side out, and sew up that gap. It looks pretty ugly, but no worries! You won't see that stitch in just a bit.


      Fold the rectangle in half, length wise.  Pop a pin an inch and a half from the top edge. Place another pin 2 inches below that one.


      Sew down the side, but do NOT sew between the two pins.


        Because we double layered the glove, we don't have to hem the ends or the thumb hole. Fabulous, no?! However, because knit does like to roll, I folded over the seam at the ends and just tacked it down at that one spot. This just helps that seam not roll outwards. Do that at both ends.


      Flip it out, and you are finished with your first glove! Do the exact same thing for the other glove.


      I was thinking of all the different things you could make, using this exact same method.

  • Make a skinnier version for your kids.
  • Use man fabric and make a manly version. My hubs loves to hunt, and these would be perfect for him! Camo anyone?
  • Don't leave a thumb hole, make it 20 inches long, sew the ends together....cute head warmer!
  • Don't leave a thumb hole, make it wider...leg warmers!
  • Don't leave a thumb hole, make it the same size...cute kid's leg warmers!
  • Make it really really long (60 inches or so) and bout 14 inches wide, sew the ends together...infinity scarf!
....ok, ok, I'm done now. Point is, there are options. I like options. Happy weekend!!
P.S. These are for sale in my shop with new colors to be added soon!

 Hebrews 3:4   For every house is builded by some man; but he that built all things is God. 
Pin It

Linking to:
My Girlish Whims
Tatertots and Jello

Wednesday, October 17, 2012

Travel Earring Book Tutorial

        We do a fair amount of traveling, and I have my packing system pretty well established. However, the other day, the thought occurred to me that my zip-lock bag method for packing earrings could probably be improved upon rather simply. I always get annoyed with untangling and trying to find matching earrings...this little felt earring book solves the problem!


      All you need to make one, is some felt squares and some trim if you want to decorate the front. You really could even get away with hot gluing this, if sewing isn't your thing! I found that the cheaper felt, like you get in the kids craft section works the best to poke earrings through, because it has a looser weave.


      Stack them, and sew straight down the middle.

      Close the "book", and sew down the "binding". This just helps it not want to fall open.

      You might need to trim your "pages" all to match, felt has a way of stretching out weirdly.


       I sewed a strip of lace down the front just for pretties.


      Now all you have to do is stick your earrings in it! Depending on how the earring post is made, you might have to wiggle it a bit to get it to poke through. Types, like hoops, that connect to themselves I just pinned on the edges of the "pages".


        Now mind you, this isn't an absolutely perfect system, the earrings still will flop around a bit. I just pack the book flat in my bag, and it works wonderfully. It keeps them organized and tidy so it makes me happy!
Do you have a good method you use to pack small things? Do share!

Proverbs 15:16   Better is little with the fear of the LORD than great treasure and trouble therewith. 

Monday, October 15, 2012

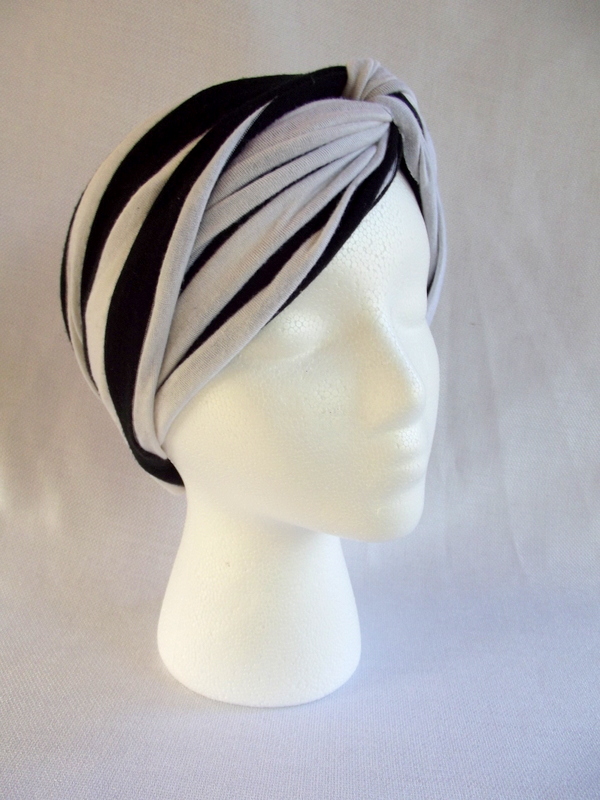
Super Simple Head Wraps


      I love hats of any kind, and I see these as just a variation of a hat. Honestly, any excuse not to have to fix my hair for the day, and I'm a fan! These are a fun accessory, and a total cinch to make!


      All you need is two pieces of jersey or knit fabric. The more stretchy the fabric is, the better. Cut two rectangles, 20 inches long by 14 inches wide.


      Loop one piece around the other to make an "X".


      Sew the ends together. You should have two circles of fabric looped around each other.


      Now, Put both seams together, and sew down.


      Flip it around so the seam is facing inward, and you are set. You can wear it scrunched together like a headband, or separate all the folds to cover your whole head.


       These are available for purchase in my shop, with more colors to be added soon. These are fun accessory that would make great gifts...stocking stuffers maybe? Ack! I can't believe Thanksgiving is next month!! Every year, I vow to get all my Christmas shopping done in August...and it usually gets done oh, Christmas Eve or so. Anyway, make a turban, head wrap thing-a-majigger, and you'll feel better about your lack of holiday preparation. Promise.

Psalms 139:1-3   O LORD, thou hast searched me, and known me. Thou knowest my downsitting and mine uprising, thou understandest my thought afar off. Thou compassest my path and my lying down, and art acquainted with all my ways. 
Pin It

Wednesday, September 5, 2012

It's that time again...Winter scarf sewing


       When I was up north the other week, I had a rather shocking revelation. Seasons actually change up there! It was cool and lovely in the mornings and evenings...which led me to realize I had best get a move on with stocking the shop with Fall and winter items! I must say, the heat and the bugs around here certainly did not put me in the mood to sew scarves. Looking at them does make me happy to know sometime in the future it will cool off!


     I have a good more to do, but this is a good start. I've been stock piling knits for a while now, can you tell?? I showed you last year, in this post, how you can make your own ruffled scarf using elastic thread. This time around, I thought I'd throw out a few pointers on using elastic thread. I've had some questions on it over the last few months, so hopefully this will help a little.

  1. Hand wind your bobbin with elastic thread. Don't pull it tight, but don't let it be loose either. You need a little stretch in the thread as you are winding for it to sew right.
  2. Set your top stitch length just a tad longer than your usual straight stitch. You shouldn't need to do anything to the top tension.
  3. If the elastic isn't sewing in tight enough, or it is too tight, adjust the bottom tension. You can do that by adjusting the little screw on the bobbin case. You'll need to make it tighter or looser based on how thick the fabric is you are working with. (see the little screw on the side? Just mess with it to get the thread to feed right. Don't forget to set it back for regular thread!)


       Also, just to throw out there, all knits are not created equal. For a nice ruffle, the thinner the knit is, the better. Rib knit or double knit will not behave very nicely with elastic thread, even baby rib knit does not do too fabulous (although, I do use it on occasion).


       Once you make one, you'll find yourself wanting to make one in every kind of knit you can find! Speaking from experience here...good thing I have my shop as an outlet for my addiction!


       Off to sit under my AC and dream of winter!

 1 Peter 5:7   Casting all your care upon him; for he careth for you. 

Tuesday, May 29, 2012

No Tie Turban Style Headbands


     I really like the look of head wraps, or turban style hair scarfs. I do not, however, enjoy fiddling with tying the thing, or worrying about it falling out! The easy solution, just a 5 inch strip of elastic!


     All you need to make one, is some fabric, elastic, and two small pieces of ribbon. Cut your fabric about 25 inches by 12 inches. Tie a knot in the center. Scrunch up the ends like so. Don't worry about keeping it all even, its not supposed to be.


     Lay one of the pieces of ribbon across it, and sew it down.


      Stick the end of the elastic against the back side and wrap the ribbon around it. Sew it down nice and securely.


      Trim the ribbon pieces, and dot on some fray check. Do the same thing with the other side. All done!


      It's a fabulous way to use fabric that is too small for clothing, but too big just to toss. You can use any type of fabric you want. Jersey knit makes a very comfy soft version, that I just love.


       I made these for my Etsy shop. I may or may not have snagged a few for my own personal use too...a girl does need some variety when it comes to these things you know.
Hoping your week is off to a good start!

Galatians 5:22-23   But the fruit of the Spirit is love, joy, peace, longsuffering, gentleness, goodness, faith, meekness, temperance: against such there is no law.
Pin It

Linking to:
My Girlish Whims

Thursday, May 10, 2012

Sling Bags - Part 2 (The up-cycled leather version)

        This is part two of my sling bag/boho bag/hobo bag/bucket bag/whatever else you know to call it bag tutorial. If you missed part 1 you can catch up by looking here. All the nitty gritty of measurements and directions for sewing can be found in that post.. This tote bag I am going to show you today is quite possible my most favorite thing I have ever made for myself. I. love. it.


    LOVE.

   
     It makes my eyeballs smile. Really.


        Let me explain a bit about this bag. It started out looking like this...


     ...a size 4, 100% leather skirt I found at a thrift store for $2. Yes, you read that correctly. A 100% REAL leather skirt for $2. Evidently the dear folks at the thrift store don't know how expensive leather is, nor do they recognize brand names terribly well. I was only too happy to oblige them in supplying the wanted $2 and dashing out with my prize. As it is highly unlikely I will be shrinking to a size 4 in the near future, I knew this skirt, was destined to be my new hand bag. Using the general measurements of the bags I showed you yesterday, I cut out my bag. I cut it flat to work around the existing seams. I was not about to spend hours deconstructing this thing!


     I also cut the straps an inch wider. As you remember from yesterday, you have to flip the bag through the straps to get the right sides out after sewing....leather is thicker than canvas, and I wanted to make sure it would fit through!
     My next step was to embellish the outside a bit. If you remember this post, you know how I once turned a vintage crochet table cloth into a skirt. I had saved the scraps from that project, and deemed them perfect to use now! The cut out is not a perfect one, but that doesn't bother me in the least.


     I used a glue stick to lightly press the design onto the bag, and hold it in place. You do not want to use pins when working with leather. They will poke holes that do not go away. Next, I sewed the design onto the bag. I worked very slowly and tried to keep all my seams hidden within the lines of the design. You can see on the back here how that looked. (I found those numbers written on the back of the leather, once I had removed the lining...not sure if it's a date or a pattern marking?)


      I also added a few more pieces of the crochet to back of the bag, cause you know, it's gotta look pretty from all sides.


     Next, I sewed the bag together. Instead of pins holding the pieces together, I used these office clips. They are quite handy to have around when sewing, I highly recommend having some on hand.


     When sewing on leather, it's absolutely necessary to have a leather needle on your machine. You will break needles and skip stitches if you don't. The other thing about leather, is, it won't want to slide under the pressure foot. The back side of leather is sort of hairy, and it grabs and sticks. I used a single sheet of tissue paper to sew over, so that the leather would feed through properly. I have no idea where I learned that, just a trick I picked up from somewhere. It works really well.


     When you get done, you can just tear it off and pick out the bits of paper. It only takes a second to do.


      I did the inside lining and pockets the same way I showed you yesterday. I attached the lining to the outside the same way as well. For the "handle" part, I sewed on a bit more crochet before putting it together.


     I think that it, and the ticking lining, add just the right touch.


      The other thing about leather, be careful with your fingernails, machine parts, and scissor tips. Leather scratches, and you don't want to mess up the finish. Which must be why I thought a scratchy fence post with rusty barb wire was the perfect photo setting. Yup, I'm a smart one.


    Not bad for $2 eh?


     The other thing that made this such a good deal, was, the leather was in perfect condition. There was not a scuff or a scratch anywhere on it! It was also thinner, workable leather, which, unless you have an industrial machine, is pretty important.


    I hope this helps you see how even a simple design like I showed you yesterday, can be translated into any style you wish. Feel free to ask questions if there is something I haven't been clear about...and as always, I love to see your versions!

Psalms 107:1   O give thanks unto the LORD, for he is good: for his mercy endureth for ever.