Showing posts with label cooking. Show all posts

Wednesday, June 20, 2012

What's for dinner?

     It's super rare for me to post about cooking on here. Cooking is necessary to eat, and I like to eat. My hubby loves to eat Asian food, I love to eat Mexican food, so we compromise and eat a lot of Italian food. Here is one of my favorite Mexican meals to make. Spicy chicken rice.


     It's cooked in the slow cooker...which makes it ten time tastier. I like my slow cooker, it makes better food than me, and it's only one pot to wash. I don't have a dish washer, 'nough said on that topic. So, here is how you can make this deliciousness. Throw in a few chicken breasts. I usually do four, and as you can see, still frozen works just fine.


     Cut up two different colors of bell pepper, and an onion.


      Throw that in the pot, and then cover it with a packet of taco seasoning...or two packets if you like. I pretty much like my food to sing and dance with flavor, so I go with two.


      Lastly, cover the whole bit with a jar of salsa. I rinse out the jar with about a half cup of water and add that too.


     Cover, and cook on high for about 5 hours. Serve over rice with cheese.


     It's also great on a tortilla wrap. Another version, is to do chicken, seasoning, a can of corn, a can of black beans, and a jar of salsa. Soooo yummy! Enjoy!

1 Timothy 6:8   And having food and raiment let us be therewith content. 
Pin It

linking to:
Sew Woodsy
My Girlish Whims
Someday Crafts

Tuesday, April 24, 2012

Random Information Day - DIY Baby Food

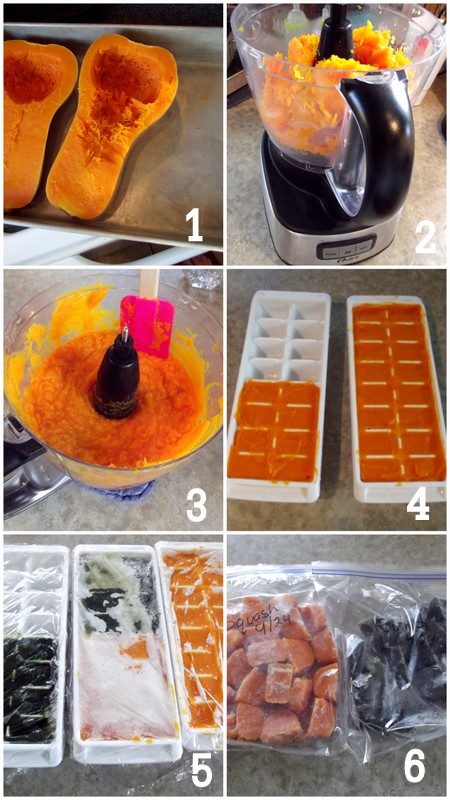
       Ick. I hate change, do you like the new blogger set up? I suppose I'll get used to it. Anyway, so here is a totally random and non-crafty post for you. Do you have a baby? Does your baby eat? Mine does, mostly paper, bugs, leaves, and any other non-edible tidbit she can get her chubby little fingers on...but I do try to get actual nourishment into her little self on a daily basis.  Here's how you can make your own baby food!


       Nothing complicated here...Start with your cooked veggie of choice, puree it, pour it into freezer trays, freeze it, and then seal the cubes in labeled Ziploc bags in the freezer. I've not priced it out to the penny, so I don't really know if it is cheaper than buying baby food. I don't see how it couldn't be cheaper, because a squash like I did here, only costs a few dollars. It makes enough squash cubes to last a good little while. I like doing it this way, because I like to know exactly what I'm feeding my kiddo. It's the real deal, so later when I'll plop that same squash in non-pureed form onto her plate, she'll have no issues eating it.


      The little cubes are a handy size for the small portions babies eat. When I'm going out, I just toss a few cubes in a small Tupperware container and take them with me. They are normally melted by the time I need them. I've also done this exact same thing with cooked chicken, I just added a bit of water to thin it out.
       As you know, cooking is not my thing in the least, but even I find this to be a pretty manageable task. =)


Nahum 1:7 The LORD [is] good, a strong hold in the day of trouble; and he knoweth them that TRUST in him.

Tuesday, January 3, 2012

Painted Cookies

      Happy New Year! Have you slept off your sugar coma yet? I for one, do not wish to see any cookies or chocolate for quite some time. That being said, this post is about cookies! =) Well, I meant to post this pre-Christmas, but didn't get to it. Sooooo, you will just have to remember it for next year.
      Decorating sugar cookies is a fun thing for kiddos and adults to do. The traditional way is with frosting, but another fun way is to paint them! Mix food coloring into some evaporated milk. (the amounts don't matter) Grab a few paint brushes, (Preferably ones that are new and haven't been used for actual painting. Yuck!) one for each color.


       Then let all your little helpers have at it! Paint the sugar cookies before cooking.


     Cook as directed. The "paint" just make sort of a glaze as its baking. My 2 year old had tons of fun doing this, and it didn't really matter how much she used.
      Good luck getting back onto the swing of things after all the holiday fun! Funky Junk Interiors is doing a great series right now on how to put those good intentions we all have for this new year into action. I'm great at making plans, but maybe not so good at accomplishing them!

Colossians 4:5 Walk in wisdom toward them that are without, redeeming the time.

Monday, August 1, 2011

Pig Pickin' Cake


     As I've mentioned before, I am not a cook. If it takes more than thirty minutes to fix, I loose my interest super quickly.I don't share recipes on here too much, because there aren't too many I actually use, much less like.  But, as my mister so eloquently says, "Even a blind squirrel finds a nut every now and then." That's deep huh. I don't know exactly how this cake got its name, I'm assuming it must have been a favorite to take to pig pickings. The nicer name is Mandarin Orange cake. At any rate, it is easy to make, and very light and yummy to eat. It's about the only dessert that doesn't involve chocolate that I'd recommend. =) Here's how to make it.

1 (18.5 oz) yellow cake mix
1 (11 oz) can Mandarin oranges, juice reserved
4 eggs
1/4 C vegetable oil
1 (16 oz) package frozen whipped topping, thawed
1 (15oz) can crushed pineapple, drained
1 (3.5 oz) instant vanilla pudding mix

1. Mix together cake mix, canned oranges with juice, eggs, and oil. (I like to reserve a few oranges to garnish the top) Pour batter into three greased and floured 8inch round pans. Layers will be thin.

2. Bake at 350 degrees for 25 to 30 minutes, or until cake tests done, Cool layers.

3. Mix together whipped topping, drained pineapple, and instant pudding mix. Fill and frost the cooled cake. Refrigerate until ready to eat.

      I always have some of the topping left over...it makes a great dip for gram crackers, pretzels or fruit. Enjoy!


"And having food and rainment, let us be therewith content." I Tim 6:8

Friday, May 27, 2011

The Yummiest Banana Bread Ever!


     This is probably the one and only time you'll ever see a recipe on here. I am not a gal who loves cooking nor am I especially good at it. (As is illustrated by the fact that I caught my oven on fire last night with my newest attempt at culinary art...my house still stinks like smoke!) My sisters are great cooks, but somehow that gene missed me. I usually stick to recipes that are short and non-complicated. This is actually my sister's recipe and her's always tastes better than mine. That being said even my poor attempts taste scrumptious, so that is how you can tell this is a good recipe!
     Want to make some? Here you go.
You'll need:
5T butter
1/2 C sugar
1/2 C light brown sugar
1 lg egg
2 egg whites
1 t vanilla flavoring
1 1/2 C mashed ripe bananas
1 3/4 C all purpose flour
1/2 t salt
1 t baking soda
1/4 t baking powder
1/2 C heavy cream
1/3 C chopped walnuts

1. Heat oven to 350 and spray 9x5x3 loaf pan with nonstick cooking spray
2. Beat butter until fluffy - add brown and granulated sugar - beat well - add egg, egg whites, vanilla until well blended - add mashed bananas - beat on high 30 sec
3. Combine four, baking soda, salt, baking powder, in medium bowl - add flour mixture alternately with cream ending with flour mixture - add walnuts
4. Pour batter into loaf pan - bake until browned and toothpick comes out clean - about 1hr and 15min
5. Cool bread in pan on wire rack 10min - remove bread from pan - cool on rack

      I double this recipe when I make it and it turns out great. I've even added blueberries to it and it was super good like that too! Happy baking!