Wednesday, July 13, 2011
Quick and Easy Bow Holder
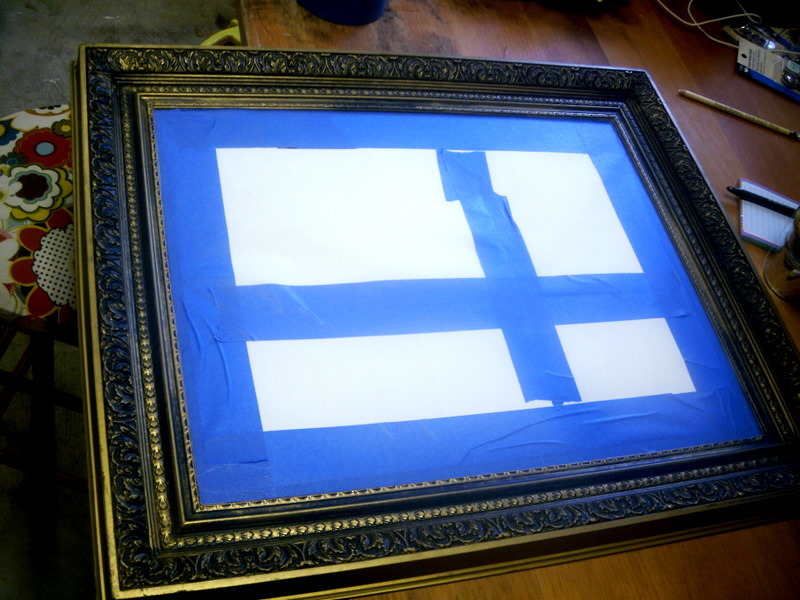
There are a thousand different ways to make a hair bow holder. I chose this route, because it was simple and fast. I picked up a 16"x20" canvas to start.
I used left over fabric from making the girl's bedding to cover it.
I just stapled it along the backside.
I cut strips of ribbon, a narrow ribbon placed over a wide ribbon, and stapled them on as well.
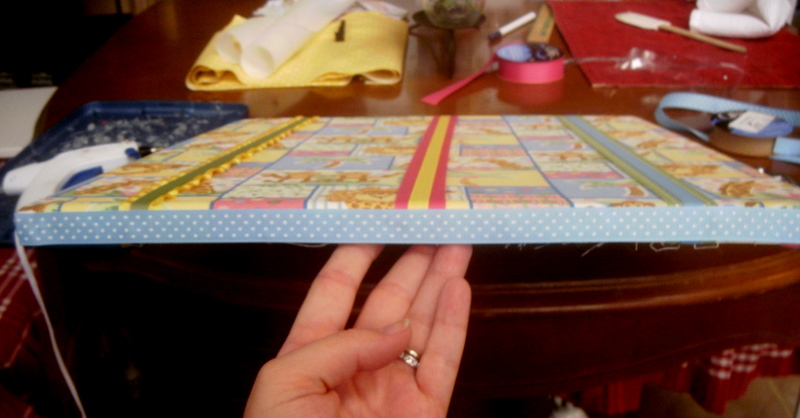
Because I was using left over fabric, it was a tad too short on the ends to cover the canvas. I simply glued a strip of ribbon around the edge to cover this little problem.
I glued two strips of ribbon to the back to tie it to a hook with. Very simply done!
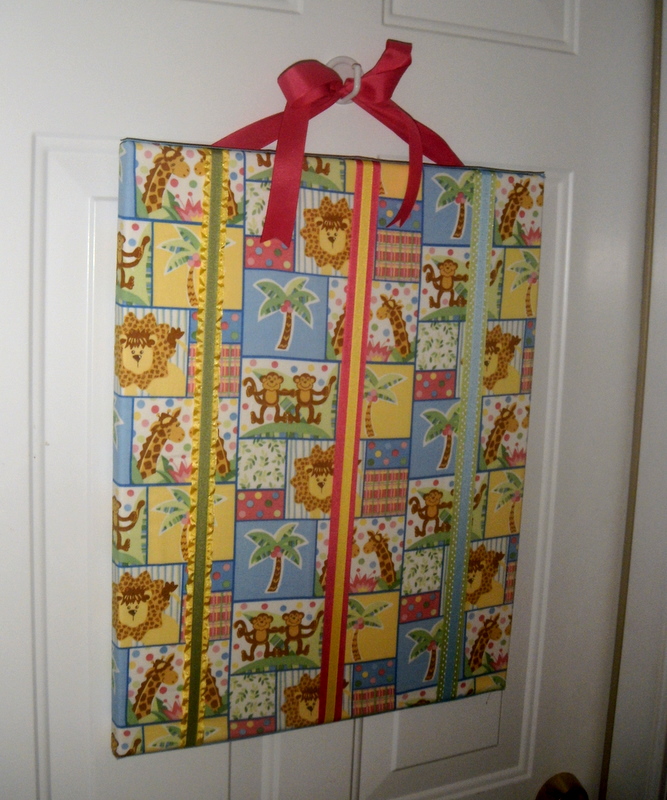
After loading it down with all the little lady's hair bows, I'm thinking I might need to make a sequel!
Let this be a warning to you if you feel so inclined to learn how to make hair bows! You might find them taking over your house!
"O Lord, how manifold are thy works! in wisdom hast thou made them all: the earth is full of thy riches." Psalm 104:24
Linking to:
Goodbye City Hello Suburbs
Fabric Bows and More
Organize and Decorate Everything
My Girlish Whims
Tuesday, July 12, 2011
Mirror Fix-Up
The other day, while perusing through a local thrift store, I discovered this mirror.
While I'm not exactly obsessed with fake gold frames, I did love the detail on the frame. I knew it could be quite pretty with a little bit of love and kindness. I taped off the mirror part.
Next, I gave it a nice clean coat of white spray paint.
After that was dry, I gave it my very favorite treatment for pieces like this....glaze. Mmmm! I just love how glaze makes details POP! It gives things such a lovely vintage look too.
This mirror had quite a bit of age spots on the mirror itself. Not very lovely to a lot of people, but I like it. It lends to the antique feel I tried to give the paint job.
I hung it on my stairway wall. The idea of hanging it here being, to have a gallery wall eventually.
I've had my eye out for interesting frames, mirrors, signs and such that I might want to collect on this wall. I'm very particular that they have some "interest" about them though. I think this mirror does, and it is a good start.
I'm a little miffed that the air conditioning vent has to be on my gallery wall of interesting things. Humph. I suppose I'll just have to imagine its not there, and be thankful I have air conditioning to start with!
I'm sure I'll have fun finding things to fill up the rest of the space. I trek up and down those stairs fifty million times a day as the kiddos' room is at the top...I'll certainly enjoy having something other than a blank wall to stare at when I get it all done!
"I will sing unto the Lord, because he hath dealt bountifully with me." Psalm 13:6
Linking to:
Goodbye City Hello Suburbs
Fabric Bows and More
My Girlish Whims
Monday, July 11, 2011
Cloth Diapers
I realize that this project only applies to a small minority, however, I myself have benefited greatly by reading other people's tips on the subject of cloth diapering. I hope, this in turn, might help someone else.
When my sister in law first mentioned she was going to cloth diaper, I thought she had lost her marbles! There was no way on earth that was going to last! However, it did last, and she showed me that not only was it easy, but it was practical and not near as awful as I had imagined. I started my first little lady on them around 9months and discovered that she actually got far fewer diaper rashes from them....and besides that, her little fluffy bum was just too cute!
I plan to use them on my new little lady when she arrives later in August. I already showed you how easy it is to make your own wet bags for cloth diapers in this post. Making your own diapers is just as simple, and I think it is just fun. There are so many cute fabric prints, I could easily make three times as many as they actually need just for the sheer fun of it!
I made a few covers this weekend to use over top of prefold diapers. Two are extra small and two are small. This video is pretty much exactly how I sew them. I've used this method to make both pocket diapers (they have a pocket to put an insert into), and covers (used over prefold diapers). http://www.youtube.com/watch?v=Y1M6xFAqS14&feature=youtu.be I make my own pattern based on diapers I already have, and on the size of insert I will be using. I also prefer to make mine with snaps, because they hold up better with lots of use, the kiddo can't pull them off, and they don't get caught on things in the wash. I put the snaps on the tabs in such a way that I can cross the tabs and snap them to each other if a smaller fit is needed.
Make sure to put the PUL fabric shiny side out so you can easily wipe down the cover for another use.
It is definitely cheaper to sew your own than to buy them, and you have the benefit of customizing the prints and construction to exactly what you want for your baby.
"Blessed be the Lord, who daily loadeth us with benefits, even the God of our salvation." Psalm 68:19
linking to:
Running with Glitter
Between Naps on the Porch
Boogieboard Cottage
Goodbye City Hello Suburbs
Fabric Bows and More
My Girlish Whims
Sun Scholars
Friday, July 8, 2011
Easy baby blanket binding
I'm not sure if I should call this a cheater's way of piping or a cheater's way of binding. At any rate, I'm sure it is not the proper way of doing things. It works great though! I wanted to make a couple knit baby blankets. I like the stretch in them when trying to swaddle a wiggly baby, it seems to hold much better than cotton. They are also warm without being hot.
I picked up two prints I liked and then used a solid color from my stash as the back layer. I cut two 36 inch by 36 inch squares.
I highly recommend that if you use two layers like this, you use knits with the same amount of stretch. For this first blanket I did not do that, and regretted it. That lighter pink was way more stretchy than the flowered top, and caused me all sorts of grief sewing it together.
Next I cut long strips of one inch wide ribbing. I sewed them together to make one long strip, long enough to go around the entire blanket.
I zigzagged stitched all the way around leaving a four inch opening to turn the blanket right side out. My serger would have been easier to use, but it is still in the shop. The zigzag stitch worked fine.
After I flipped the blanket right sides out, I stuffed my tails of ribbing in the opening and topstitched all the way around.
I used a regular straight stitch to topstitch, just adjusted the length a little longer than usual.
This is simpler than the traditional way of sewing on ribbing in my opinion.
Another baby project down! Only about fifty million more to do! =)
Linking to:
Iron Violet Designs
Simple Home Life
Sun Scholars
Freckled Laundry
Wednesday, July 6, 2011
Sewing books to check out
Well, I didn't fall off the planet, I promise. I went out of town for the Fourth and since returning have been trying to catch up on all the fun things like laundry and such...not a whole lot that might be all that interesting to my bloggy friends.
I do want to share this with those of you who are sewers though. A few weeks back I purchased this book.
It is full of simple, but very cute outfits. I don't think there is a single thing I wouldn't want to wear in this book!
The other one I bought was this one.
It is full of things to sew for kids, from toys to clothes. Again, I think I'd make one of everything in there!
I bought them with goal in mind of teaching myself to sew off of a pattern. I don't like patterns and never have managed to make a single thing from one. I realize that my sewing would probably improve greatly if I did though. These two books have super clear instuctions with lots of pictures so I am hopeful I will learn a lot from them.
Friday, July 1, 2011
Tiered T-shirt Dresses
Happy Fourth of July weekend! If you are looking for a quick outfit for a little girl in your life to show off some patriotic colors, this is it! These are easy and can take on any look you want depending on the fabric you choose.
Start with a basic t-shirt or tank.
Cut a rectangle of fabric, I used knit fabric, that is twice the width of the bottom of your shirt.
This little shirt already had a ruffle at the top so I added the blue and the red to finish it off. This will be a cute Fourth of July dress.
Start with a basic t-shirt or tank.
Ignore the onsie, I haven't used that one yet. Cut off the bottom of your shirt a little below the arm pits.
You can have as many tiers as you want and they can be whatever size you want. I sewed up the skirt portion first and then attached it to the top. Attach each tier to each other by gathering the top to match the width of the piece before it and sew.
This little shirt already had a ruffle at the top so I added the blue and the red to finish it off. This will be a cute Fourth of July dress.
The other one I did isn't gathered tiers, but short circle skirts sewn on top of each other. I sewed a bit of ruffled ribbon on the waist.
I did a 0-3 month size using the bottom of one of the shirts that I cut. I attached this one using elastic thread so it pulled in the waist a bit. I sewed on more ruffled ribbon around the hem.
And of course, no little lady can have new dress without a decent hair bow to match!
This method could easily work for an adult size. I've been dying to try it, but with only seven more weeks of the baby bump to go, I don't know that I'll try it just yet. Then again, seven more weeks is a loooong time so we'll see. =)
Linking to:
Thursday, June 30, 2011
New "Vintage" Sign
My little pantry consists of some built in shelving with no doors or anything to cover it. I've attempted to make it look attractive with baskets and such since it is exposed for all to see. That has worked fairly well, however it still looks a cluttered eyesore to me. I have a few ideas to improve it, and I started with this sign.
I like vintage things to decorate with, but can't always find authentic ones. I'm totally fine with a good imitation though! I swiped a board from my hubby's scrap pile and gave it a coat of dark brown paint. Before it dried completely, I brushed it with a whitish grey paint. I wanted the brown to streak through it a bit.
I used a stencil to paint on my letters.
After it dried completely, I gave it a good rough up with sandpaper.
I hung it on the wall at the top of my pantry. I like it. Its a start anyway, I have a fun idea to try that will cover the bottom section of those shelves.
I'm not really sure how to get my idea to work, so I'll just have to keep thinking about that one for now and be content with my cute sign.
Linking to:
Subscribe to:
Posts (Atom)