▼
Tuesday, December 27, 2011
Drawstring Bag Tutorial
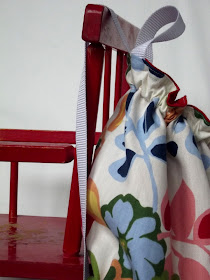
Well hello! How was your Christmas? Mine was wonderful, and perfect in every way. I've come down with a nasty cold since though, and lost my voice completely. My toddler thinks I'm whispering because I want her to play quietly, and keeps whispering back to me. Haha! I should have tried this ages ago, what a wonderful tactic! Anyway, I sewed myself a new diaper bag while I was on my Christmas bloggy break, and put together a few extra for my shop. They are great little bags, that can be used for a beach bag, diaper bag or whatever you want.
Changing up the fabric can change it to fit whatever use you want.
Each bag has four inner pockets to keep things nice and tidy.
I used nylon strap to make a handle and a strap down the back, for over the shoulder carrying.
I used heavy weight fabric for both the liner and outside, because I wanted them to very durable. You'll need 2 yards total of fabric. If you use regular cotton, I would put some stiffener or something in between to help it hold up better. I used nylon strap for the handle and back strap, and cotton cording for the drawstring.
You need to cut out the following pieces, one of both the lining and the shell.
Bag body - 29" x 14"
Bag bottom - 9" circle (I used a pie pan as my pattern)
Pockets- 29" x 8" ( this can be either of the fabrics or both)
Start with the pockets. Put the two strips right sides together and sew along the top.
Flip the right sides out, and then top stitch along where you just sewed.
Lay it on top of the bag liner. Find the center and pin a straight line.
Measure over 7 1/2 inches and pin another line.
Do the same to the left of the center line. You should have three pinned lines, making four pockets.
Sew down each pinned line.
Fold the lining right sides together, and sew down the side.
Hold the bag lining open at the base.
Set the lining circle into the bottom and sew on. I would highly recommend pining it in place first. I was on my sixth bag at this point, so I was feeling rather confident in my mad sewing skills and skipped pinning.
Once the bottom is sewn on, flip it right side out. Make sure you have caught all the pocket layers around the bottom, and that everything is sewn securely.
Take the outside piece of the bag, and find the center. Mark where you want the button holes to be for your drawstring, and sew them in. ( you can also use grommets if you don't want to do button holes)
Fold it over and sew up the side, just as you did with the liner. Cut a strap the length of your bag plus a an inch or so.
Sew on the bottom circle, just as you did with the liner. Make sure to sandwich the strap in between as you sew.
OK, almost done! Stuff the outer shell into the liner, making sure both right sides are together.
Cut an 8 inch piece of strap for your handle. You want it to be sewn on like this.
Pin it on accordingly, sandwiched between your outer shell and liner.
Pin around the top, but remember, you'll need to leave a space open to turn it. I usually double pin where I don't want to sew.
Sew around the top. Turn the bag right sides out through the hole you left open. It should look like this.
Top stitch around the top, closing up the hole as you go. Now, you need to sew another line about an eighth of an inch beneath that all the way around. Sew another line about an inch and a half beneath that one. This is where the drawstring will go.
Thread your drawstring through the bag. If you use cording like I did, I found it was easiest to tape off the end of the cord. Stick a safety pin through the tape and then thread it through.
All done! I know that that's a super long explanation, but it really is a simple bag to make!
I hope this all makes sense, let me know if you have any questions!
Thanks for reading and happy sewing!
Isaiah 42:16 And I will bring the blind by a way that they knew not; I will lead them in paths that they have not known: I will make darkness light before them, and crooked things straight. These things will I do unto them, and not forsake them.
Linking to:
Someday Crafts
My Girlish Whims
Sew Much Ado
Its Overflowing
Free Pretty Things For You
Sew Woodsy


Wonderful tutorial! I think I could actually do this. You did a great job! Thank you.
ReplyDeleteI love your blog; very inspirational! And I may try this too.
ReplyDeleteI LOVE THIS!! ...VERY CREATIVE!! Great blog you have here, SO much inspiration.. I'm Marilyn, your newest follower with smiles.. .I Would LOVE for you to please stop in and link via my Pin'Inspirational Thurday Party happening today.. **WISHING YOU A SPECTACULAR NEW YEAR** Cheers to much success in 2012.. Xoxoxo..M
ReplyDeletehttp://theartsygirlconnection.blogspot.com/2011/12/pininspirational-thursday-14-linky.html
That is so cute I can hardly stand it! Thanks for sharing at Overflowing with Creativity! I’m excited to continue being inspired by you in 2012!!! XO, Aimee
ReplyDeleteFabulous tutorial! Definitely going to be putting it to use for a project for my son! Thank you!!!
ReplyDeletewww.uncommondesignsonline.com
This bag is great! I posted a small drawstring bag on my blog this week but I can't wait to try this big one! I found you through Someday Crafts. Thanks for sharing!
ReplyDeleteGreat tutorial! I've just made a knitting project bag based on this tutorial and it worked just fine. Thank you for sharing. :)
ReplyDelete(http://mustikkajatyrni.blogspot.fi/2012/09/neulepussukka.html)