Tuesday, April 10, 2012

Slit Sleeve Top Tutorial

       These are a also called peek-a-boo shoulder tops...or whatever other name you know to call them works too. This shirt is very basic, but has the nice option of being somewhat like a tank top too.


         Excuse the somewhat blurry picture, the mosquitoes right now are insane. Its absolutely impossible to stand still for three seconds without getting bit! Anyway, so this is roughly how you can make one.
       Trace a shirt you have, use a pattern, or just measure like I do, and cut out a basic shirt shape. This doesn't have a set in sleeve, but you do need to include a sleeve shape in your cut out. I made mine a boatneck. I made the sleeves to be fitted, and I tapered the sides of the shirt in a bit.


       Now, at the top of your sleeve, cut out a curve. I made mine about an inch deep, and left about a two inch strap at the shoulder.


      I sewed it together just like a normal shirt. Don't forget to sew the sleeve ends together.I hemmed all the openings, and added a little bow at the sleeve connecting point just for pretties.


       This was my practice go around, but there will be a black version available for purchase in my Etsy shop. I used a polyester interlock, and I really liked the structure it had even though it was stretchy.
      I have got a bunch of new things lined up to add to the shop, and tutorials to follow, of course. Right here lately, it's a matter of choosing between making something, or doing the write up on it. Since, photography is my nemesis, I've been choosing the making. Hopefully, I'll get myself caught back up here soon.

Psalms 128:1 Blessed is every one that feareth the LORD; that walketh in his ways.

Monday, April 9, 2012

Easiest Skirt Ever - Bubble Skirt Tutorial


      My little lady is going to be having a birthday, and I knew just the thing to whip up for her. See, she has this thing for polka dots, or "pokey dots" as she calls them. If I don't dress her in "pokey dots", she'll change the second I'm not looking until she has them from head to toe. If you can't beat 'em, join 'em! Have you ever made a bubble skirt? You should, easiest thing ever, and little girls love them!
      Start with two strips of fabric 2 or 3 times the width you actually need, and about twice the length you need. Sew it up the side so it's a big tube.


        Fold the bottom up to the top with the right sides out.


       Sew a gathering stitch across the top and gather up the skirt so it's just a bit larger than you actually need it in the waist. Sew a strip of elastic into a circle for the waist.


       Sew the elastic to the top, stretching it a little as you sew. Step back and smile at your fluffy new skirt.


       Lots of leg room for the littles to run and play to their heart's content!


      And enough "polkey dots" to please even the pickiest of toddlers. Check, check and check! Have a happy week!

1 Timothy 6:6 But godliness with contentment is great gain.

Pin It

Friday, April 6, 2012

Friday Favorites - Organization

      Since moving into my itsy bitsy little house a year and a half ago, I have learned what a invaluable thing good organization really is. A lot of things can fit in a small space if you use a bit a creativity.
Here are some tips I always keep in mind. Make everything do double duty.  If you use up space with a piece of furniture, make sure you are getting every last bit of use out of it you can. Can you put something under it? In it? How about behind it? This is a great example of this.

Pinned Image
 
      Wall space, use it for decoration and for storage in one pop!

whole entry (7)

       Hang things, any where and everywhere you can.  I have hooks on the backs of all my doors for things that just have no other place to go. Isn't this scarf organization system so great?!

Pinned Image

      I did a bit of my own organizing in my work room. I need order to work well, and things were getting a bit out of hand with my supplies. I cleared up my ribbon problem with this simple solution. Two candle holder and a plant bracket from the thrift store, and two metal rods from the hardware store.


      I hung it above the door, because that happened to be the only space available. That's another thing about organization, always look up...vertical space can be used too!


      I was able to fit two rods on it, and the plant bracket supports it from sagging in the middle. It also makes a handy hook for when I need to hang up a garment to work on it.


       This freed up my dowel rod system for holding my trims and ribbon that I use more frequently.


       Ugh hum, this isn't actually all of it either...I have a tote holding all the trims that aren't on rolls. I know, I know, I'm a bit of a Diva when it comes to supplies. When I want to make something, I want to have the stuff to do it and seven different colors to choose from to boot! Bad, bad habit! You should see my fabric stash!...or not...
     Happy Easter weekend! I think I'll have to show Easter dresses post Easter, as I am not quite finished (or started as the case may be). Don't forget in all the egg hunting, chocolate overdosing, and pretty dressing to remember why we are celebrating Easter at all!....We have something to celebrate because Jesus died for us, rose again for us, and LIVES so that we can live too!

Mark 16:6 And he saith unto them, Be not affrighted: Ye seek Jesus of Nazareth, which was crucified: he is risen; he is not here: behold the place where they laid him.


Pin It

Thursday, April 5, 2012

Dining Chairs Revisited

        I've been rather blog negligent this week. Life just happens sometimes, I guess. I did want to pop in to show you the latest evolution of my dining chairs. If you remember about a year ago, I started with these chairs. (there is eight of them and the table actually spreads to be a whole lot larger than is pictured here)

   
       I painted and glazed them, and made slip covers for them.


        And we lived happily ever after...until about a week ago. See, those slip covers turned out to be pretty annoying. They were forever needing to straightened and such. I don't like high maintenance things, the less fussing I have to do to something the better! I happened upon some khaki colored ticking and just loved it!


      I think ticking has a nice old timey feel, and the neutral color and pattern can go with any decorating whims I happen to have.


          I'm pretty happy with it. I sprayed all the seats with scotch guard after I finished covering them. Hopefully that will help keep them clean.


       I think the lack of slip covers makes it look neater and cleaner too. Maybe the table will actually get redone at some point soon! I hope so! Well, enjoy the rest of this pretty Spring day!


Isaiah 49:13 Sing, O heavens; and be joyful, O earth; and break forth into singing, O mountains: for the LORD hath comforted his people, and will have mercy upon his afflicted.

Monday, April 2, 2012

Pattern mix top

   
      So, how do you feel about pattern mixing? I've seen enough examples of it done right, that I've been won over. I personally like it best when its limited to a specific color pallet for both patterns. I've never actually sewn anything with contrasting patterns, so I decided to give it a go with this very simple shirt.


      The shirt itself is beyond simple. It is just a rectangle with a neck hole. I cut out a triangle of the front piece and used the cut out as the pattern for the polka dot piece. The neckline has small lines of elastic thread sewn onto it and across the sleeves. It gathers the neckline just a bit.


    I think it adds just the right touch to make it a little dressier.


       Overall, I like it. The contrasting panel takes an average shirt and makes it classy, and unique.

   
      Now that I'm looking at in the screen here, I'm thinking I could be persuaded to like it with yellow polka dots too...or maybe turquoise. OK, so maybe different colors and different patterns can go together...hey, one step at a time! If you give this a try, I would suggest trying to find two fabrics similar in weight to sew together. That striped fabric is lightweight knit, and the polka dot is a thin polyester. They both have nice drapes, and I didn't have a whole lot of trouble with seam puckering. I used a serger to sew them together which also really helps keep the seam smooth. I would love to find some pretty floral knit and try it with polka dots...hmm must go fabric shopping! This design will be available for purchase in my Etsy shop.
    

       By the way, thank you to the dear soul who donated that perfectly wonderful skirt to the thrift store...I enjoyed immensely that it cost me only $1, and I also enjoy the color tremendously! Bless you!
       I really like that this shirt is pretty versatile, you can dress it up or down.


      I also like how the panel adds a vertical line, which is more flattering than a straight horizontal one.

       This is my third top go into the Spring Top Contest over at Made by Rea. Four is the limit, so I have one more to dream up...fun fun! It's great to have some motivation to try out some of these ideas I've had kicking around in my head for a while. It is also good for my shop to get some fresh stuff in it, fun sewing and shop sewing all in one shot! Can't complain about that!

Philippians 4:6 Be careful for nothing; but in every thing by prayer and supplication with thanksgiving let your requests be made known unto God.

Friday, March 30, 2012

Friday Favorites - Spring!!

Pinned Image
(couldn't find the original source)

       That picture totally make me want to go read Ann of Green Gables and go have a picnic or something. Did you know Easter is right around the corner? I've got one little girl Easter dress done, and one to go. Have you Springified your house and wardrobe yet?

Pinned Image

        I saw this dress, and decided a yellow dress must absolutely be in my future. Hopefully one that costs a tad less than $995, but it is gorgeous no?

Pinned Image

       So, what do you think about the floral trend these days? I am not one for trends unless they are something that is somewhat timeless. For instance, I'm not a huge fan of chevrons...don't hate me, its OK if you are. Florals though, I think I like.
Pinned Image

Pinned Image

      I whipped up this floral tank out of some vintage rayon type fabric my mother in law gave me. Its hard to see, but it has a layered front and a key hole back. Knits are definitely my comfort zone since non-stretchy fabrics tend to be a lot more fussy to fit correctly. I'll have to work out some of the kinks before I attempt a tutorial. Just for grins and giggles, I'm entering it into Made by Rea's Spring Top Contest. You should totally check out the flicker pool, for some good sewing inspiration.


       I want to put a bit more "Springness" about the house. I showed you my mantle here, but I haven't done much else since then. 
Pinned Image

      Is this not the cutest little plant stand ever? Love it!

Pinned Image
     
       I wish I had mad free hand painting skills, I would totally do this something in my house. I bet modpodge and fabric would do the trick too. Hmm, must find an old dresser.

Pinned Image
(couldn't find the original source on this one, any one know?)

     That rug is pretty cute too! I like the different patterns. Well, I've got a little one loudly telling me in every baby noise possible that she is hungry and I had better do something about it quick...so have a happy weekend! Don't forget to take some time to head outside and enjoy the season!

Isaiah 51:15 But I am the LORD thy God... I have covered thee in the shadow of mine hand...

Wednesday, March 28, 2012

Tank Wraps

       I haven't a clue what to call these, so "tank wraps" it is. I like layers, but I don't like to roast to death. Enter the tank wrap, a cool way to add texture, color, and interest to any summer outfit.


      A tank top and a cardigan all rolled up into one, with a bit of shiny bling to complete the look.


      I used a very lightweight knit for these, and I hand dyed them. These colors make me think of two things, beach houses and sherbet. Summer at its finest, in my opinion!


     I've moved multiple times in my life, but I've always lived within driving distance of the beach.
Ever since I was a kid, I've always loved looking at all the bright and pretty colored houses that line beach roads.

Pinned Image

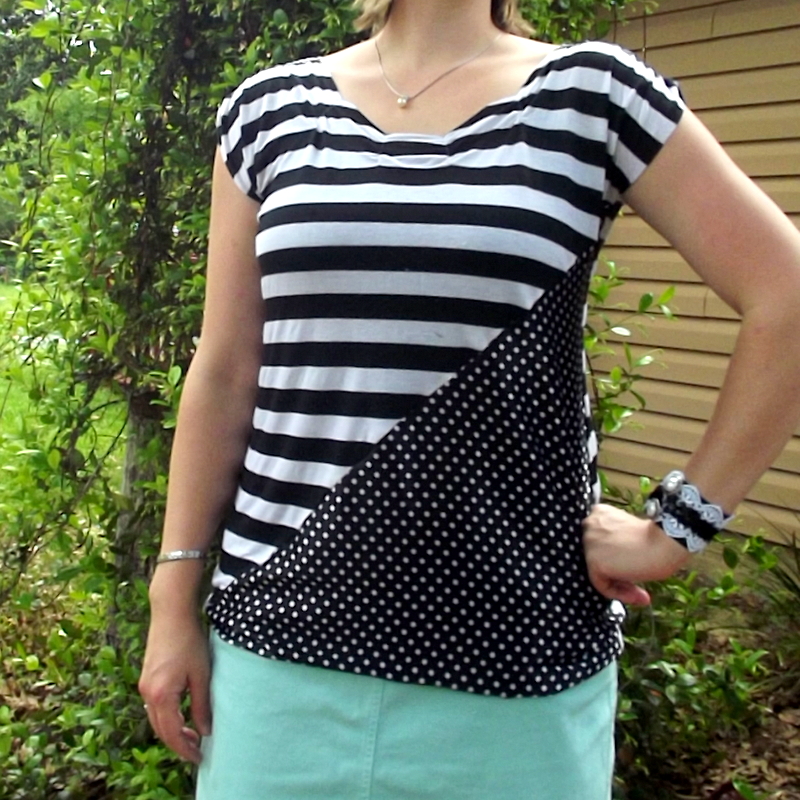
     They don't have them so much here, but where I grew up in Florida there is endless miles of them. I love pretty colors! So, here is how these tank wraps look wearing them.

      
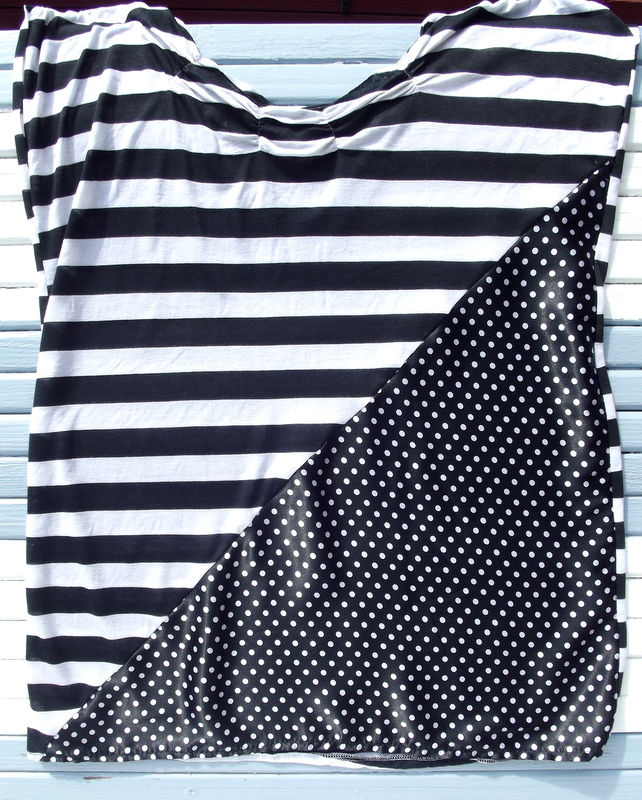
       Want one? Of course you do! Here is how, and this is a "one size fits most" deal. The smaller you are, the more flowy it will be. First off, cut out these pieces. The lighter weight material you use, the better. (the black is the front pieces, the red is the straps, and the purple is the back panel)


      Sew the front two side pieces to the back panel. Sew a gathering stitch across the top of the two front pieces. I used a serger to sew the larger seams. If you use a regular machine, I would suggest using a very, very narrow zigzag stitch and a longer length stitch. Machines have a tendency to want eat thin fabric, and the longer stitch will help the pressure foot to jump over the fabric better.

        Take the strap pieces and sew them right sides together and turn. You should have two tubes of fabric like so.


         Sew the gathered sections to the straps and topstitch.


       You'll need a two inch size mettle ring at this point. * Quick tip: I have found the best selection of different size rings at the best price in the plumbing section of the hardware store. My apologies to all the plumbers in my town for cleaning out their stock of supplies. Just as a forewarning, you probably will have just smile graciously at the weird looks you get from men actually shopping for, you know, plumbing parts for the purpose of plumbing. You will probably also have to assure about a dozen different employees that you are indeed in the section you wish to be, and no, you don't require their assistance.* Back to the task at hand, loop the other end of your straps around the ring and sew.


       Find the center of the back panel and mark it.


      Loop it around the mettle ring and tack it down. I don't sew a straight line, because I like it to look draped rather than stiff.


       I did not hem, because this fabric and style didn't require it.


     These are going to go in my Etsy Shop, so if sewing isn't your thing, you can always find one there. In case you happen to be still enjoying the remnants of winter...please enjoy what you have while it lasts. I got at least forty mosquito bites just while snapping these pictures. Warm weather isn't always what it's cracked up to be. Enjoy the rest of your week, see you on Friday!

Psalms 19:7 The law of the LORD is perfect, converting the soul: the testimony of the LORD is sure, making wise the simple.